Showing posts with label freezer-friendly. Show all posts

Saturday, March 17, 2018

Take Them a Meal - Like Cheesy Chicken Enchiladas!

We have a new baby in our church family and last night J and I delivered the new parents a meal. I've written about the importance of and tips for meal delivery before, but since having a child of our own, this has become a real passion for me. Y'all, look around yourself and search for the new parents and offer them a meal. I promise you, "it takes a village" means more than helping raise a baby, it means making sure the harried parents are actually eating and eating more than just Easy Mac. The same goes for families in mourning, dealing with extended illness, or otherwise in crisis. 

I don't know this family very well (yet?), so we're just bringing dinner and sides tonight, but meal delivery can be so much more, especially if it's someone you're close to. As I mentioned in my previous post, after the birth of my niece we provided a few dinners, some breakfast items, snacks and all the fixins to make my in-laws' lives easier. 

It doesn't have to be a great production. Feeding people, I believe is my love language; I take so much pleasure in knowing that my hands produced something that will nourish their bodies, and maybe their souls. But just thinking about a person or family in need can be the thing that helps them keep their head above water. And those little extras are especially useful. 

How does that proverb go? Bring a mom a casserole and she'll have dinner for a single night. But bring her a casserole, some frozen pizzas, a pint of ice cream, a tub of cookie dough, freezable muffins, and a Stouffers lasagna and she'll actually retain her sanity during the first newborn sleep regression or bout of colic or postpartum hell. 


Let's go over a couple really easy tips to make meal delivery better for everyone:

     
  • Use recyclable or cheapo plastic containers. New mamas have zero time or brain cells to spend on remembering whose Pyrex is whose. 
  • Include idiot-proof instructions for reheating etc. Again, the brains of folks in are almost worthless at this point. 
  • Include all the working parts for your meal. If you're bringing bagged salad with your spaghetti, grab a bottle of dressing. If you're bringing frozen waffles, bring syrup, too. Who knows the last time they hit the store. 
  • And if you know they're going through a particularly trying time, with lots of visitors and little time (or money) for shopping, consider including a pack of paper towels, plates or plastic cutlery. 
  • If you're organizing repeated meals with a group, use a planning service like Take Them a Meal, where you can include specific instructions (address, preferred delivery time, dietary needs) and each volunteer picks their "shifts" and logs what they're bringing. Please don't bring 10 broccoli casseroles in a row. They aren't a sponsor of my blog, but I can't sing the praises of Take Them a Meal enough; it's a great help to the volunteers and the family expecting dinner. 

So we showered little Eli with some love and offered his parents a chance to sit down and eat a real meal. I'm used one of my favorite recipes, which is perfect for meal delivery and freezer friendly (so you could benefit, too!). 

For some reason, as a single twenty-something, I was subscribed to a Pillsbury mailing list for coupons and recipes (probably why I resemble the Doughboy a little more now). I found this chicken enchilada recipe way back when and realized, even when I was cooking for one, that it was a find. 

It's relatively inexpensive and the prep takes less than 20 minutes. It's so easy to prepare, I could probably stop pulling the recipe out. You make an enchilada sauce from the soup, sour cream, chilies and cumin; then mix in the chicken and cheese; roll your enchiladas and top with sauce. Since all of the ingredients are fully cooked, you only need to heat through and melt the cheese and it's done! 

I love this recipe because it allows me to be thrifty with my ingredients and really plan ahead. You know I love to pinch a penny and we try to be especially economical with meat. Your local supermarket deli likely reduces rotisserie chickens at the end of the day,  at our Walmart you can sometimes snag them for less than $3; or whenever you make "basic" chicken - like grilled or even fried chicken, without a lot of sauce or bold flavorings - you can shred/chop those leftovers and freeze in 2 cup portions. Having chicken on hand is perfect for soups, chicken salad, or enchiladas! 

And these enchiladas are HUGE and hearty. If I'm delivering a meal for 3+ family members, I usually buy the aluminum 8x8" pans with lids ($1 for two!) and it's a legit struggle to fit eight enchiladas in there. What I like to do at home is use my 8X4" narrow pans and make two packs of four enchiladas. This way, we have dinner tonight and a freezer pack for whenever we, or someone else, needs it. The small packs are perfect for little families, so having a couple of these waiting in the deep freeze is very convenient. And they do freeze beautifully. 

Since everything is fully cooked, you don't necessarily need to par-bake the dish (but you could, just for 15 minutes or so), then wrap thoroughly in foil. To prepare, thaw in the fridge the night before and then bake until hot (which does take a little bit longer than when everything's room temp). And for the love of Pete - WRITE THESE DIRECTIONS ON ALL YOUR FROZEN FOODS. 1. You'll know what the eff those stacked up aluminum pans are filled with and 2. you (or whomever you deliver them to; fresh or frozen) will know how to reheat. This is incredibly obvious and a total pain if you forget to do it...like I do ALL.THE.TIME. 

Courtesy of Pillsbury.com 

Even if you aren't planning a meal delivery and could care less about deep freeze meal prep, this is a great in-the-moment meal. The enchiladas feed a crowd, they're really flavorful - you really get the cumin and the chilies, and you can dress them up as much as you like with salsa, sour cream, guac etc. 

I like to serve mine with what my Venezuelan friend calls "Mexican salad" (now that's a sociology project for sure). It's greens and cucumbers topped with canned whole kernel corn, canned black beans (rinsed and drained), cheese, and crushed tortilla chips. For the dressing you mix a taco seasoning packet into ranch dressing. We're talking Taco Bell level of culinary accuracy, but it's so good. Who could turn down "fiesta ranch?" 

But in all seriousness, take a minute this week as you meal plan to see if anyone in your circle is hurting, stressed, totally drained or just in need of a night off from the stove. And offer to bring them a meal. Or a pie. Or a drop off a gift card to a local pizza joint. Your small amount of effort will make a huge impact on their life and show them how much you truly care. 


Wednesday, March 7, 2018

Winter 2.0: Time for Chili

Yup, daffodils & snow flurries. 

Remember last week when I was bouncing around in my sandals in the sunshine proclaiming that Spring was here? Well, then March started in like a lion with 50 mph winds and it snowed this morning. 


We should all be used to this already, North Carolina weather is notoriously fickle year-round. There have been years where I've worn short sleeves at Christmas and shivered through snow in my Easter dress. And I guarantee that those instances were met with drastically different weather the days before and after. It's just madness down here. 

So I'm officially withdrawing my Spring pronouncement and cancelling all spring menus until further proof of season-change is provided. I take back last week's bright surf 'n' turf salad and suggestions that you look for fresh produce and instead dive head first into warm, cheesy recipes. 

Let's start with a bowl of chili. 
I recently bragged that I was proud to have found two recipes to claim as my own; one for chicken noodle soup and the other for chili. I was saving my chili recipe so as to not give it away before my church's annual chili cook off; you know, because I was going to win. 

Spoiler alert: I didn't win, I didn't get honorable mention, but almost all of it was scraped out of the Crock Pot when we got ready to leave. It may not have won me another Summit Church title (still proud of being the Dessert Queen), but it is a tasty recipe. 

Chili is contentious. Folks like what they like and they don't want to deal with any nonsense outside of their chili definition. My dad's chili always has mushrooms, J's is made with beef and local sausage, a Texan girlfriend lives for no-bean chili. Up until recently, my chili loyalty went to whoever fed me the most (generally my dad #onlychildperks), but now I can boast a preference for my recipe. It started as a ground turkey chili, but is also good with lean beef; it's made with black beans; and you have to top it with green onions and sour cream. 

Because of my dad's kitchen sink chili - with meat, beans, tomatoes, mushrooms, peppers, and onions - I tend to drift to a chunkier style of chili. Some recipes are more watery (and I mean that in the best way possible) with fewer ingredients beyond meat and tomatoes. That's edging into soup territory for me, so I appreciate that this recipe has lots of bits and pieces and retains a heartiness. Plus, the "secret" or at the very least, unexpected, ingredient - crushed tortilla chips - thickens the liquid further and pulls all the flavors together.

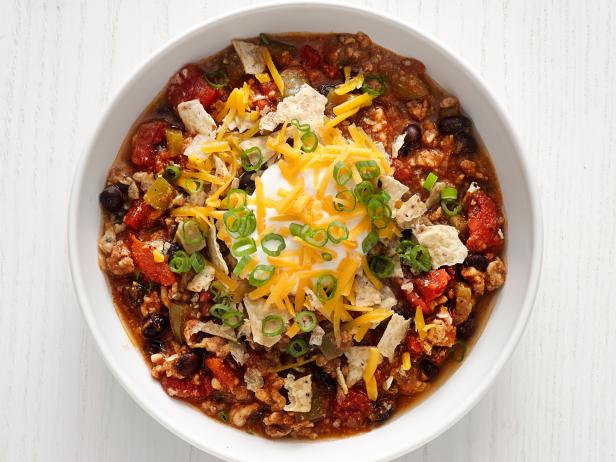
Photo courtesy of Food Network magazine

Food Network magazine, who originally produced what I'm now calling "my" chili, called this recipe "Quick Turkey Chili" and they were spot on. This recipe takes hardly any time and only one pot to prepare. 

Several years ago, I was the Fellowship Coordinator at our church and I had to organize all our monthly meals, including the Chili Cookoff. I remember a lady rushed in right before church started. She'd had a family emergency the night before and was frantically making her chili in front of me. She threw canned veggies, tomatoes, spices (including a Hidden Valley ranch packet?!?) into a Crock Pot, cranked it to High and left it to simmer for the hour-long worship service. And she won. By a landslide, according to our judges. I've rolled my eyes at that performance for years, but now, my recipe doesn't take much more effort. 

First you muddle the tomato paste and spices together to make a really aromatic lump, for lack of a better word, to create a flavorful base. You then literally dump everything else in to cook off (like your raw meat) or to simmer and meld together. The starch from the tortilla chips acts as a binder and pulls everything together as it simmers. Then you add a punch of flavor with some extra green onions. It couldn't be easier. Unless of course it was... but you have to be extra thoughtful in your grocery shopping and meal prepping. 

As you may know, J & I are on different work schedules which saves us a bundle on day care costs, but also means we have to be incredibly organized in our meal planning for everyone to eat healthy, homemade food. To do so, we plan out a week's worth of lunches and dinners and make one big weekly shopping trip (goal: bi-monthly or even monthly shopping excursions). We peruse sale papers; make monthly trips to a bigger city to hit Aldi, Trader Joes, and/or Sam's Club; and try to get the best deals on what we think are smart purchases. We try to stick to our weekly lists, but especially on our monthly Asheville trips, we'll stock up on items that are on a good sale or we know we'll use.

You have to be smart and think big picture. If peppers are on sale [often Aldi will have them for $1.50/3-pack (even the more pricey colored ones!)], buy several to bring home, dice, and freeze in one-pepper-portions for later. In dishes like chili, peppers will be soft anyway, you don't lose any texture by pre-freezing (and you won't need to thaw them, either). 

Also, this recipe (and most soup recipes) makes around a half-gallon of finished product. I divide it right away into freezer-safe quart containers (these are 50 cents each at Dollar Tree or use freezer bags and lay flat on cookie sheets in the freezer, then you can stack them like books!). One quart usually feeds us for a lunch and dinner apiece (plus a baked potato) and I can immediately freeze the other quart for later. 

If you think making this chili is fast, you won't believe how fast it is to just thaw a quart! 


Thursday, January 25, 2018

MY First Comfort Food Recipe

Always incorporating food
into our adventures -
Homemade ice cream at the
Knoxville Farmers' Market
I enjoy cooking, serving, and eating food. Heck, I even enjoy incorporating food into my other hobbies - like reading cookbooks or cooking magazines, or you know, writing this very blog. Despite all of that interest, love, and time, I was still disappointed in my relationship with food because something was lacking: an achievement I hadn't quite reached. 

There are lots of things I love to cook and that I make well, but I'd never call them "mine." I've longed for "my" recipes. You know, the ones that when my Baby is grown, he'll call and say "Mom, how do you make your ...?" and I'll pull out a raggedy stained recipe - that I no longer use, because it's pure muscle memory now - to hand off to him. 

I think most people have that kind of food association with the people they love. There's some recipe that will always be associated with, and tasted best when prepared by, your nana, husband, mama, or next-door neighbor. It might be from scratch, semi-homemade, or maybe even take-out they served in just the right way. 

My dad has a gift for cooking outstanding fried chicken. He uses boneless chicken breast tenders for these "Daddy Nuggets." They're best served with rice, gravy, and tiny "baby biscuits" (which are mine ONLY; y'all eat the full-sized ones). Or maybe his best dish is his "Daddy Burgers" (Seeing a pattern here? Only child + Daddy's girl); they're better than any restaurant burger I've ever had. 

Mom makes the best tomato + Velveeta baked pasta (sorry, no affectionate name here. I called it "Barf" as a kid, for looks alone). And her beef stroganoff is humble, simple, and THE BOMB. Despite all logic, Dad's attempts to elevate it with homemade sauce and fresh peppers fall short. 

And J makes the best meatballs. Period. The funny thing is, they're from his Mamaw's recipe, but she has zero recollection of every making them...so they're certainly his now!

But I wanted MY recipes. Things Baby will specifically request, like I do with beef strogranoff: "No, Dad; I want Mama to make it!"


Sunday at The Summit
First, I wanted my own chili recipe. I was raised on - you guessed it - my Dad's chili. Every winter, he'd get out the gigantic pasta pot (now the electric turkey roaster - efficiency, y'all) to make gallons of chili. We'd freeze it and eat homemade chili year-round. Then, I married J who had his own distinct and delicious recipe. And we're members of a church whose core tenants are: 1. The Great Commandment, 2. The Great Commission and 3. January = Chili Cook-Off time. So, I've seen the depth and breadth of the definition of chili. And how attached folks are to their chili. There are hardcore camps: beans vs. no beans, beef vs.turkey vs. veggie vs. venison, spicy vs. mild; and Lord, all the secret ingredients!

The good news is, after much tinkering, I've found MY chili recipe. However, I'm not sharing that with you today. The Cook-Off is this Sunday and I'm not giving these goods away. Who knows, maybe I'll report back with my "prize-winning" recipe. 

Next, I wanted to have a signature comfort food. I know this is a broad category covering all types/courses/flavors of food. I want it to be something Baby and Hubs request when they're sick or had a rough day or just need a reminder of a warm, loving home. And I've found it, perhaps in the most cliche, comforting sick-day food: chicken noodle soup! 


My lil' star face! 
Baby is an adventurous eater and will try anything, but this kid LOVES soup. Maybe it's the fun slurpy    noise or the warmth or his lazy refusal to chew,    but this first time I made this, he cried until I fed it to him, straight from the pot...for breakfast. And I don't blame him, it's delicious. 


Instead of long noodles like Campbell's or egg noodles, this recipe uses the cutest pasta option: stars! The original recipe is designed for "pastina," a generalized name for the smallest pasta shapes. There are a variety of teeny tiny shapes, but I prefer stelline pastina, shaped like itty bitty stars. Using pastina is obviously adorable, but adds great texture to the soup, too. The veggies are all similar tiny cuts which makes for a better mouthfeel. And c'mon, we all need a bowl of whimsy sometimes. (See PRO TIP below.)

I used a hunk of this 5 lb. Grana Padana cheese I won
in a Splendid Table drawing. I've frozen hunks of it for
recipes just like this that need a little fancy cheese. 
The soup is incredibly quick (less than 30 minutes) and easy to prepare (under 10 ingredients), but has deep developed flavors. You saute the trinity (carrots, celery, onions), then add thyme, chicken broth (see PRO TIP below) and the secret ingredient: a 2-inch piece of Parmesan rind. That may sound bizarre, but it adds a great nuttiness and saltiness, making your soup taste like it simmered for hours. If you can't get Parmesan rind, be sure to garnish your bowls with grated Parmesan. But I highly recommend the rind; grocery stores with an actual cheese counter normally sell rind for fairly cheap (and it keeps in the freezer for ages). Or, kill two birds with one stone and splurge on a little wedge and use every inch of the cheese. 

This was originally a meat-less recipe (could be vegetarian, if you swap in veggie broth), but the first time I made it, I tossed in leftover rotisserie chicken - GAME CHANGER. We buy chicken a lot - even the cuts we don't normally prepare for entrees - just to shred for enchiladas, soups, curries, or chicken salad. Grocery stores normally mark down rotisserie chickens in the evening, which we'll occasionally buy, shred and freeze in two-cup servings. Shredded chicken is certainly one of our pantry (freezer) staples and fits this dish so well. Makes it a little more filling, but not heavy, and adds extra texture, too. 

When you're looking for a simple dinner-in-a-hurry that tastes like low-and-slow comfort food, this soup is just right. But be sure to give me credit; it is MINE, after all. 

Thursday, November 20, 2014

Warm & Hearty Cottage Pie

FACT: Cold days literally require warm and hearty meals that fill you up, raise your temperature and stick to your ribs the rest of the evening.

FACT: Few things are as perfect on a bone-chilling day as meat and potatoes. 

Which makes cottage pie an excellent dish for the bitter winter months. 

Tuesday it hardly got above 30 degrees in our town, and while we aren't trapped in the mega Snowvember storm that's pounding Buffalo, New York; we were mildly distraught at the incredible change in temperature; which made a piping casserole of cottage pie all the more delicious and comforting. 


Cottage pie is a traditional food of the UK - a cousin to shepherd's pie which is made with lamb - with a meat and vegetable ragout traditionally topped with mashed potatoes and baked. It makes for a warm and filling meal, even without any other sides, that leaves you feeling satisfied and your diet balanced. 

My dad made cottage pie a few times when I was younger, and even piped the potatoes on top with pea eyes to look like ghosts once and I loved it. He's been making it more frequently - perhaps out of sheer ease, how inexpensive it is to prepare and how far a dish of it can go, and we've started experimenting with it, too. 

You can take cottage pie in so many directions by swapping out standard meats and veggies, trying new top layers or even funky presentations. I didn't know it at the time, but some of my favorite mini-chefs on MasterChef Junior were actually tasked with elevating shepherd's pie on this week's episode (you can stream the episode and this season on Hulu/HuluPlus). I've tinkered with it some, but I think I've hit my stride with a recipe adapted from Clean Eating magazine (this was one of their few successes I mentioned). 

The meat mixture is actually vegetable-heavy, using very inexpensive winter vegetables like parsnips and carrots and lean meats. I've used beef and ground chicken and they both turned out well. Lean beef still adds some extra fat that gives the dish more juiciness, but if you use ground poultry you can add more broth and simmer it down some. I love ground chicken as a substitute for red meat and even grind it myself with my KitchenAid, and find it far superior to ground turkey which can become unbearably dry. Simmering the meat and vegetables with tomato paste adds an acidity and a richness that pulls all of the flavors together beautifully. Fresh carrots can be assertive, parsnips tend to be perfumy and canned pinto beans are almost bland, but the tomato paste and rosemary bring together the best of each ingredient. 


To avoid carb-o-loading, I top my pie with pureed cauliflower. I've featured cauliflower several times in posts and I think despite being fairly unappealing raw, it is one of the most versatile and delicious vegetables -- and it's almost a dead-ringer for mashed potatoes (but drastically healthier)! When making cauliflower puree as a side dish, I merely steam it then puree with garlic, S&P, and a tablespoon of butter; but to make it more cohesive with the meat, more flavor is needed. The chicken broth adds an earthy, saltiness that can be lacking and the lemon zest brings a surprising pop to what otherwise might be a one-note topping. 

This recipe makes four gigantic servings and is hearty enough to feed a lumberjack but sneaks vegetables in in such a way that even the pickiest child would enjoy it!

I highly recommend checking your local forecast and making this for your next cold winter evening!


"Clean" Cottage Pie

Ingredients:

1 medium sized head of cauliflower, chopped into florets
1/4 c + (see note above about ground turkey) low-sodium chicken or vegetable broth
2 t olive oil
3/4 t lemon zest
salt & pepper
3/4-1 lb ground lean meat
1 parsnip, peeled and finely chopped
1 carrot, peeled and finely chopped
1/2 large red onion, finely chopped
3 cloves garlic, minced
15 oz. can unsalted pinto beans, rinsed and drained
1/4 c unsalted tomato paste
1/4 c finely chopped fresh parsely
1/2 t dried rosemary
paprika

Method:

Preaheat oven to 400 and spray 8x8" baking dish with non-stick cooking spray. Set aside. 

Fill a large saucepan with water and fit a steamer basket on top. When water is boiling, add cauliflower to steamer; cover and steam until cauliflower is tender, about 15 minutes. Using either an immersion blender and bowl or a blender (such as a Ninja) blend cauliflower with olive oil, broth and lemon zest. Add salt and pepper to taste. Blend to desired consistency (I like mine super smooth, but small lumps would be good, too). 

Spray a large skillet with non-stick spray and add the meat. Cook over medium high heat, breaking up the meat with a wooden spoon until cooked through. Transfer meat to a bowl. 

Using same pan, cook sautee parsnip, carrot, onion and garlic until very tender, about 10 minutes. Add meat (and drippings), tomato paste, beans and herbs. Sautee for 3 minutes. (Note: If using a more dry protein, you can add more broth, if needed. I like for it to be "wet" but not sopping; this way it won't dry out while baking.)

Spoon meat-veggie mix into the baking dish, spread in even layer. Top with cauliflower puree and spread evenly. Top with a sprinkle of paprika. 

Bake on top oven rack until hot throughout and cauliflower is lightly browned, about 30 minutes. (Note: you can even broil it the last 2-3 minutes to get some extra brown and a little crunch on top). 

Tuesday, November 4, 2014

Fall Fat Kid Friday: Pumpkin Chocolate Chip Bread

Another post for my sweet-toothed "fat kids." This one's for the fall-flavor lovers in all of us and uses the veggie of the season to make a sweet, dense and soft pumpkin chocolate chip bread. You can be the star of your bake sale or your husband's breakfast (trust me) with this truly from scratch treat.

Pro Tip: Pour some batter into a ramekin for a taste test serving before slicing the loaves! 


Yes, Libby's has provided God knows how much canned pumpkin for the world. I know I ate my fair share as a kid; and loved it. But preparing your own pumpkin puree is so easy and inexpensive that you can certainly do it yourself. And as a bonus, homemade pumpkin puree is better tasting and better for you than canned, you're eliminating any unknown ingredients or fillers (Clean eating fat kid?).

Processing your own pumpkin really only involves four steps:

  1. Remove pumpkin top, slice into quarters and remove seeds/pulp. 
  2. Bake on a metal sheet pan, flesh side down, at 350 for 45-60 minutes, until tender. 
  3. Scoop out cooled flesh into a food processor, puree until smooth. 
  4. Place puree in coffee filter or cheesecloth-lined strainer for 8 hours to drain any extra liquid. 
For more detailed instructions with photos, visit Taste of Home's tutorial here.

You can then store it in airtight containers and can freeze for up to a year. We package 2 c. puree (equivalent to 15 oz. commercial can) in  zip-top freezer bags and lay flat to freeze. They're easily thawed in the fridge over night or in cold water (make sure the bags are sealed and haven't cracked) and you can use them for any recipe calling for canned pumpkin - including pasta sauce, ravioli filling, muffins or this splendid bread!

With store-bought or homemade pumpkin puree this recipe is a breeze and makes for a product that looks much more polished and difficult than it really is. From start to finish, your mixer will do most of the work with the exception of some light whisking and folding in the chocolate chips. Which makes for a wonderful opportunity to bring in your mini-chefs. Loaves of bread are wonderful gifts - for any occasion, and they're freezeable - and imagine the pride your child would have giving their teacher or grandparent a loaf of bread they made!

It bakes up into beautiful burnt orange dotted with gooey chocolate pieces and a shiny sugar crust. The batter isn't doughy and is thin, like a cake batter, but makes for hearty slices of bread that are still soft on the tongue.


And the flavor just screams autumn! Pumpkin, despite being the obsession of the middle class - I mean, pumpkin spice lattes even have their own trending hashtag #PSL - is a very subtle flavor. It has a squash-y undertone that is mild and savory but slightly sweet and can be manipulated in so many ways.

But as we all know from pumpkin pie, when paired with the right spices, pumpkin can sing. Warm, spices like cinnamon, cloves and nutmeg which are also "in season" in winter like hard squashes brighten pumpkin's flavors to a whole new level of comfort and deliciousness. So dotting that warm, spicy bread with semisweet (or even dark chocolate) makes for a great contrast and only adds to the texture. I sprinkle on extra raw sugar before baking (a trick I learned from Martha Stewart) to add a crunch to the top, but in this case it also lends a burst of sweetness.

This bread would be a great feature for dessert and coffee, a staple at day-after-Thanksgiving brunch or as a hearty after school snack. You could even get creative with any leftover slices (if you ever have them) - this would be a great base for a bread pudding with vanilla glaze or dipped in eggs and cereal crumbs for freezer-friendly French toast.

I think I'll go cut myself a slice now!


Chocolate Chip Pumpkin Bread
Adapted from Our Best Bites 

Ingredients: 

3 c all-purpose flour
2 t ground cinnamon
1/2 t ground nutmeg
1/4 t ground allspice
1 t baking soda
1 1/2 t baking powder
1 t salt
1/2 c brown sugar
1 1/2 c white sugar
6 oz. container plain or vanilla yogurt
3 eggs, slightly beaten
15 oz. canned pumpkin puree or 1 3/4 c homemade puree
1/2 c vegetable oil
1 t vanilla extract (use 1 1/2 if using plain yogurt)
1 c chocolate chips (plus more for tops of loaves)
raw sugar (for tops of loaves)

Method: 

Preheat oven to 350. Spray two loaf pans with non-stick spray.

Combine flour (reserving 1 T), baking soda and powder, salt and spices in small bowl.

Toss chocolate chips in small bowl with 1 T flour; this will prevent them from sinking in the pans.

In a mixing bowl combine sugars and whisk to remove lumps. Add yogurt, eggs, pumpkin, oil and vanilla. Mix until smooth.

Slowly add dry ingredients to wet and mix until just wet - do not overmix. Gently stir in chocolate chips and extra flour.

Divide batter between loaf pans and sprinkle with extra chips and raw sugar.  Bake for 45 minutes or until a toothpick comes out clean.

Allow to cool for 10 minutes on wire racks then run a knife around the edges and flip loaves onto rack.

To freeze: cool completely then store in freezer-safe bags or vacuum seal. Will last for several months in the freezer. Pull to room temperature or microwave lightly to thaw.

Sunday, September 28, 2014

No Nonsense Chicken Enchiladas

You all know that after flavor, ease and expense are my highest priorities in food. And since we bought our house and moved, that has never been more true. Our kitchen is the only room that is unpacked and remotely functioning; but we are still scrambling to find all our utensils and have been slack grocery shoppers. With that being said, dinners have been quick and easy, and usually come in a bag - but I took the opportunity this weekend to cook a real meal, and make several meals for later, to be kept in the freezer.

A great way to save money, is to scour your grocery store for "reduced for quick sale" items. This is especially handy with packaged produce, like mushrooms and lettuce; dairy items and the biggest savings are in meat. If you're an astute shopper, you can easily figure out which days are flagged for restocking and reducing current inventory. Our favorite local store, Ingles, puts bright stickers on produce and bulk items and that's the first thing we look for. Grabbing deals like this can be hit or miss, and sometimes on impulse rather than need alone but they're real steals! Be especially mindful of items that freeze or dehydrate well.

The other day, I went to Ingles to get some breakfast items, and I walked past the meat cooler where almost three pounds of chicken thighs were on sale for less than $2. Did I need chicken thighs? No. But, I brought them home, cleaned and repackaged them in two-portion airtight containers and threw them in the freezer. I later used a pack for last week's chicken panang curry and thawed the remainder to make two batches of these chicken enchiladas.

With meat already on hand, the rest of the items are staples in our home, so this recipe is incredibly inexpensive and would be easy to make on a whim, too.

Since you're making the roll-ups yourself, this is a very economical way to make individual servings, servings for two or a family. I doubled the recipe, which normally makes eight enchiladas or four servings. But instead of making two batches of eight I cooked in a smart way that would give us the most meals with the least amount of waste - one batch of eight for when we had a couple of friends over and two batches of four that we could eat ourselves; we ate one 2-person batch that night and I froze the other 4-pack and the 8-pack. Eight servings or 3-4 meals for under $10!

I love that these enchiladas are hearty but without feeling heavy or over-dressed with cheese or sauce. I chop my chicken into big, rough chunks, which gives the filling a thickness and great mouth feel as opposed to some saturated with sauce and runny filling. The green chiles add a mild heat and sweetness and the cumin adds that traditional "taco" flavoring we all love. You could easily dress this up with more spices or even some roughly chopped cilantro (which I despise). Also, you can add other vegetables to the filling; the Progresso soups include black beans but if you had some extra sweet corn kernels, kidney beans, sauteed onions or mushrooms (look in your fridge for leftovers or the reduced section of the store) you could add 1/2 a cup or so to the filling, too!

The recipe only involves mixing up two different bowls of ingredients - one for "sauce" and one for filling, and actually rolling the enchiladas. It's that simple, which makes this a great recipe for little helpers. If you chopped the chicken, this whole dish could be made by your children. How much would they enjoy eating something they'd made?

I hope you're able to incorporate this meal into your own fiestas and family dinners!


Chicken and Cheese Enchiladas

Ingredients:
1 can (18.5 oz) Progresso chicken enchilada soup or southwestern vegetable soup
1/3 c sour cream
1 can (4.5 oz) chopped green chiles*
1 t ground cumin
2 c chopped cooked chicken
1 1/2 c shredded cheese
8 flour tortillas (corn works, too)

Method:

Pre-heat oven to 350. 

In a medium bowl, mix soup, sour cream, chiles and cumin. Pour 1/2 c soup mixture into ungreased 2 quart casserole dish for full serving (use smaller dishes if making smaller, freezable portions - 2 enchiladas per person). 

In another bowl, mix 1 c soup mixture with chicken and half of the cheese. 

Place 1/4-1/3 c chicken mixture in each tortilla. Roll up and place seam side down in the baking dish. Pour remaining soup mixture on top and sprinkle with remaining cheese. Cover dish with a piece of alumninum foil sprayed with nonstick cooking spray. 

Bake 30 minutes, remove foil and bake 5-10 minutes until cheese is melted and bubbly. Allow to rest at least 5 minutes before serving. 

If making to freeze: Only par-cook the enchiladas, about 15 minutes. Cool to room temperature then wrap with plastic wrap and foil to put in the fridge. When you want to cook it, pull it out the night before (so you'll have less reheat time) then cook at 350 for the final 15 minutes.

*You can use the canned green chiles, or roast your own if you have fresh peppers on hand. Green, sweet or red peppers would be good, but if you want to add heat add jalepenos or even something hotter! Toss your peppers on a baking sheet and place in a 500 degree oven. Cook until the skins are wrinkled and getting dark. Remove from the oven and throw them in a zip-top bag to steam, this will help the skin peel off, Rub them gently to remove the cooked skin. 

Sunday, July 20, 2014

Life-saving Meals: Homemade Frozen Food for the Sick, Shut-in and Overwhelmed

Last week, we welcomed the newest member of our family to the world. Miss Zayleigh, our niece, was born on July 11 and both her and momma are feeling great.

Amanda, Zayleigh and Jordan
But despite her having all her fingers and toes and being quite possibly the calmest, quietest little bundle of joy I've ever seen, we knew her parents were in for a long, exhausting week. And as we discovered while planning our wedding, when you're stressed and tired, the first thing you feel like giving up on is cooking good meals. We certainly ate our fill of take-out, pre-packaged junk in the lead up to our wedding (six months ago, already!?!). So, J and I took a few hours and less than $30 to make a bundle of goodies for the family to eat.

Food gifts can be such a blessing to a family in need. As Deacons at our church, we're constantly asking folks undergoing surgery, loss or hardship if we can set up meal deliveries. And while any donation of food is a great gift, by saving money and time; home cooked meals that the recipients can eat on their own schedule, without guests, are so important.

Our menu for the new parents included:

All of these recipes were simple, relatively inexpensive (including the sides or "add ons") and will be delicious, wholesome meals for their family.

And a hidden benefit of delivering frozen meals, is that most recipes are for two whole portions or are easily doubled. So, if you know you'll have a need for some heat-and-eat meals in the future (for yourselves or others) you can easily make a dish for dinner and have the second portion frozen for later. This is great if you know of someone who will be having surgery soon, has a baby due in the near future or you're preparing for a busy back-to-school month or the beginning of sports season.

Because of the ease of making several portions to freeze at once, we love to cook freezer-friendly meals throughout the year and keep extra portions on hand. For ideas on other freezer meals, click here or visit the "freezer-friendly" label to the right. 

I'll be sharing more on the dishes we made this week (especially my mom's millionaire pie recipe) but for now, I want to share some food delivery tips and dish on the delicious french toast sticks.

Here are some tips for when you prepare and take meals to someone in need:

  • All but the french toast sticks were self contained in aluminum foil pans with plastic wrap or foil. It's important to try to limit the dish washing for your recipients; and that age old argument of "Where's that casserole dish I loaned you? You never gave it back!" It's even thoughtful to include a pack of disposable plates, cutlery and napkins in your delivery. 
  • All of the dishes we prepared take little more than refrigerator thawing and reheating (except for the pie; nothing to do but eat it!). I think bringing things they can cook on their own schedule is important. They won't feel like they have to eat with or in front of you while you visit and if they have a new baby, for example, their meal schedule may be all out of whack. Bring things that give them some ownership over their meals, and will help make their houses smell good - the French toast certainly does!
  • Include precise directions, written on the package, if possible. I wrote any thawing and prep instructions on the pan lids or bags with permanent markers. 
  • Plan ahead. For your sanity, and theirs, plan ahead. Make sure you know of any allergies and if you're part of a meal delivery group, communicate - so the family doesn't get five lasagnas in a row. I remember when we've had meals delivered to our family, usually after a death; it's a sweet, but monotonous train of casseroles. Talk with your fellow meal-makers and schedule some variety. 
  • This may also be a veering away from one-pot casseroles, but think about the whole meal experience for the family. Try to include sides or add-ons that the family would enjoy with the meal but might not have on hand. And again, try to branch out - step away from bagged salad and cookie dough. 

Now on to the French toast.


I love French toast, but we rarely eat it at home because 1. we rarely have a lot of bread readily available, and 2. y'all already know that I hate mornings and I especially hate cooking in the morning. But this solves all of my problems.

First, French toast can be made with almost any bread and one of the tips of this recipe is to save your bread ends, leftover hot dog buns (why 10 buns but only 8 dogs?!?!) etc. in the freezer and then make French toast sticks when you've saved enough. Also, discount bread is pretty easy to find. Our Wal Mart has a "old bread" cart in the bakery for the discounted goodies that are a few days past their prime. I was able to score two huge loaves of fluffy French bread (so this is French French toast, thank you) for only 70 cents each! And a local bakery has a "happy hour" on their last work day where everything's half-priced. That's inexpensive, locally sourced bread! Win!

Secondly, these sticks don't require any thawing time and can be popped straight from the freezer into the oven and cooked in around 15 minutes. So, if you throw them in the oven, you'd have time to get ready while they cooked on their own. And, because I miscalculated my snooze button again (don't tell J), I was able to do a test; turns out they travel well too! I put them in a tupperware, drizzled on the syrup and ate them on the road - no more dangerous than a McMuffin (but more flavorful and budget friendly).

Too often, I think French toast can be soggy, flaccid sticks that soak up syrup like a sponge and aren't of a particularly pleasing texture. But with the crunchy cereal coating(and the crust of the bread I used), these sticks are crispy and stand up to the syrup. I used our Ninja food processor to pulse the cereal to get some very fine pieces and some larger chunks; you can customize your crunch-level with how finely you grind the coating.

The flavor is pretty classic, warm cinnamon and vanilla pair so well with fluffy bread and syrup. It reminds me of being a kid and waking up on a Saturday morning to someone already cooking. If only I could watch cartoons at work. And you could really go anywhere in customizing the flavor, too. Adding some pumpkin pie spice or cloves and nutmeg would make this even more autumnal. Or you can use different cereals. I ran out of cornflakes in my second batch, so I used crushed rice Chex and Special K honey and granola. I recommend straying away from the super-sweet cereals, or pairing them with a more simple flavor, since you're bound to douse this in syrup anyway.

I've really enjoyed these sticks for an elaborate-feeling, but utterly easy breakfast; and hope you do too! I know a little momma who claims they're a "life saver"!


Freezer-Friendly French Toast Sticks
Adapted from Taste of Home

Ingredients: (Note: I did a recipe-and-a-half to do a whole loaf of French bread)

6 slices day old bread (ideally in thick slices)
4 eggs
1 c milk (any kind - I used unsweetened vanilla almond milk)
2 T sugar
1 t vanilla extract
1/4 - 1/2 t ground cinnamon
1 c+ ground cornflakes (or other cereals), plus more as needed

Method:

Cut each piece of bread into thirds to make sticks.

In a large casserole dish, whisk eggs, milk, sugar, vanilla and cinnamon until well mixed. Place bread in the dish and allow to rest for 45-60 seconds. Flip the bread to coat other side.

Dip each piece into crushed cereal, coating all sides.

Place on large greased baking sheet. When completed, place baking sheet into the freezer for at least 45 minutes or until bread is firm and partially frozen. Transfer to a labeled freezer bag or airtight container in the freezer. (I would suggest using within 2-3 months to avoid freezer burn.)

To prepare frozen sticks:

Preheat oven to 425. Place desired amount of sticks on a lightly greased baking sheet. Bake for approximately 8 minutes, flip and bake for another 8-10 minutes or until golden brown and hot.

Serve with powdered sugar, syrup and/or sliced fruit.

Wednesday, June 18, 2014

Itsy Bitsy Stuffed Peppers

Let me start by saying that I am awful at naming dishes, much to J's disgust. My mom makes a delicious tomato-Velveeta pasta dish that I've called "barf' since I was old enough to be so openly sassy; and for as long as I can remember, I've always called stuffed peppers "monkey brains." And that was totally normal in our house.

However, since the first time I pulled a vacuum-sealed bag out of the freezer and told J we were having "monkey brains," I haven't heard the end of it. Yeah, yeah, I know, it sounds awful and since it's visually quite similar, that makes it even more unsettling and disgusting. But, I won him over with the delicious bell peppers stuffed to the brim with a mixture of ground beef, rice, tomatoes, onions and spices. We even made our own last week using leftover golubtsi filling!

And after last week's recipe book re-do (more on that another time) we decided to try a recipe for itsy bitsy monkey brains.. er, um... stuffed baby bell peppers.


This recipe was pretty simple, although somewhat time consuming, and generally good for you. Unlike most stuffed pepper recipes, this one didn't call for any carb-y fillers like bread crumbs, rice or oats - it was clean eating at it's finest, just meat, vegetables, and spices with limited amount of cheese. We did use a pre-seasoned sausage (Johnsonville hot Italian links, casings removed), so that is more processed than if you went to a butcher shop and had sausage ground up for you. But we trust and enjoy this brand (and had it on hand) so we decided to use it. If you aren't using a pre-flavored sausage you will want to add more dried spices and fresh peppers (see note below) to get fully robust flavor.

I grabbed the first pack of sausage I found in our freezer and it turned out to be hot, which paired with the chipotle chile powder made for a very spicy bite. But it wasn't overly spicy and paired really well with a dollop of plain, non-fat Greek yogurt. The spiciness is well-rounded, not just a burn-your-mouth heat, but a smoky flavor that compliments the innate heat and sweetness of the peppers. The muenster melts beautifully and adds a buttery consistency and flavor to the heat. And the final squeeze of lime juice adds a tartness that cuts through the heat and brightens the flavor of the pepper. I loved that each component of this recipe - the filling and the blistered peppers - tasted great on their own and paired together. To make successful dishes, you have to use individual delicious components.

This recipe makes quite a portion - around 24 peppers - which we served for dinner with grilled corn and will use the leftovers in an eggy hash tomorrow morning. But I can see this making for the most beautiful cocktail appetizer. They are quickly eaten in two bites without utensils and would be a vibrant canape for any party! I will suggest that if you choose to serve them in that way, you should blot the pepper skins after their quick "fry" and drain the sausage after sauteing. The peppers are naturally juicy and with the added oils, they can be somewhat slippery and leave a bit of a trail of juice, which works if you're eating off of a plate but not so much on a cocktail napkin.

Also, like most stuffed pepper recipes, this has make-ahead and freezer-friendly potential. You can pre-blister and stuff the peppers up to 4 hours in advance and then bake off when you're ready. And you can also pre-stuff and then freeze them to bake later. This would be particularly economical since you only need 1/2 lb. of sausage, which usually comes in 1 lb. packages. If you're freezing to bake later, I'd suggest not blotting the grease, just to make sure they don't get overly dry. I'd put them in the fridge the night before you plan to serve them and bake until heated through. They won't be as pretty; the pepper skins will probably be a bit softer, but they will still taste delicious.

Enjoy!


Stuffed Baby Bell Peppers
Adapted from Food Network Magazine

Ingredients:

3 T extra-virgin olive oil
1 lb assorted baby bell peppers (approx. 24)
1 small onion, diced
3 cloves garlic, minced
1/2 t. ground cumin
1/2 t. ground oregano
1 t. chipotle chile powder
kosher salt
1/2 lb. hot ground sausage*
3 oz. muenster cheese, diced (about 3/4 c.)
lime wedges, for serving

*If using plain ground pork or plain pork sausage, add 1 poblano chile, seeded and diced; 1/2 t. ancho chile powder

Method:

Preheat oven to 425. 

Heat the olive oil in a large nonstick pan over medium heat. Add the baby bell peppers in a single layer and cook, turning, until the skin blisters and they begin to brown. About 8 minutes. Transfer to a plate. 

Add the onion, garlic cumin, oregano, chile powder(s), optional poblano and 1 t. salt to the skillet. Cook, stirring until the onions are softened. 

Increase heat to medium high and add sausage; breaking up with a wooden spoon and cooking until pork is no longer pink. Remove from heat and cool. After cooling briefly (or until room temp. -- depend on how much time you have), crumble sausage into fine pieces and stir in cheese. 

Make a slit in each pepper with a paring knife, cutting from stem to tip.Stuff 2-3 tsp. of meat mixture into each pepper. Place on a parchment-lined baking sheet. 

Bake until peppers are hot and cheese has melted, around 10 minutes. 

Season with salt and serve with lime wedges.

Saturday, May 24, 2014

Our Clean Eating Detox: Day 0 Observations

Because we are pursuing a healthy lifestyle and love to try new things and/or are masochists, J and I are starting a Clean Eating detox tomorrow.

Clean eating is a premise we've flirted with some in our cooking, and find exceptionally intriguing. We recently had a conversation with a friend about how little legitimate food we are actually eating. As a society - if not an global era - we are eating more processed, refined food-like products rather than actual, unadulterated fruits, vegetables, proteins and grains.

Just look at the ingredients on the back of this snack pack of animal crackers. I bought them because they were inexpensive and in a low-calorie serving, but then the ingredients were pointed out to me.

Gotta love the typo too... 
Although clean eating diets do combine elements of several "trendy" diets - low carb, gluten-free, organic - it's based on the solid principal of cooking and eating ingredients that are as close to their natural state as possible. So the summer Cookout shake binge is on hold, but the recipes we're working with for the next two weeks look pretty great.

The detox is a plan we found on Buzzfeed - the black hole into which all 20-somethings fall and lose hours on end - and is thoroughly planned out. Seriously, we're talking 53 pages of menus, FAQs, equipment (paltry) and grocery (insurmountable) lists. The cleanse lasts 14 days and is planned where several "big batch" dishes are made that will be served in several meals so they've scheduled everything perfectly - even the Saturday prep days, what to pack in your lunchbox, how to store it,  and freezer packs with "when to thaw" instructions. Each day includes breakfast, lunch, a day snack, dinner and a night snack. Only a  few of the recipes repeat - only breakfasts and snacks - so it's a ton of variety.

The variety makes for an impressive fortnight menu that's heavy on the veggies and fruits, fatty proteins like nuts and fish, and white meats, but not light on flavor. For example: Day 5 includes a cauliflower omelet, quinoa and blueberry salad with lime and mint, carrots and hummus, salmon with green beans and lentils and blueberries with almonds.


We start our clean eating adventure tomorrow, so today was spent shopping and doing prep - and it was quite an educational undertaking.

First, I'd like to say that the pre-planned grocery lists are very heavy on the first week - so you can do freezer packs and make dishes late in the week, with leftovers continuing into Week 2. With that being said, List 1 had over 60 items on it -- only a few of which we had on hand at our house, spices mostly (Week 2 has 30+). So one of our first lessons was that clean eating is...expensive! 

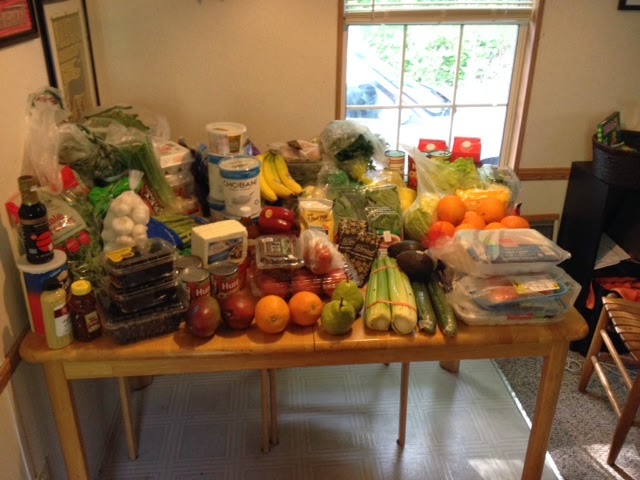
The plan is designed for one person, so we had to double everything (quite a math struggle - especially with some units/ingredients "quart container of basil"??) and that pushed our bills (yes, bills, more on that later) even higher. Look at the sheer amount of food we had to purchase.

For perspective - this table seats two full-sized chairs per side. We thought we'd have to use the leaf to hold all the food!
This haul included, but was not limited to: 128 oz. plain Greek yogurt, 24 oz. feta cheese, 24 oz. 70% cacao dark chocolate, 4 red bell peppers, 2 lbs. spinach ...


8 oranges, 2 oz. fresh mint, 64 oz. unsweetened plain almond milk, 20 oz. bone-in, skin-on chicken breast; 20 oz. fresh salmon, 20 oz. ground turkey, 4 bulbs of fennel, 2 seedless English cucumbers...


a bottle of Tamari (gluten-free soy sauce), 6 bunches (12 c.) of kale, 53 eggs (for both weeks, thank goodness), 28 carrots and so much more!


Certainly not the way to an efficient fridge... 
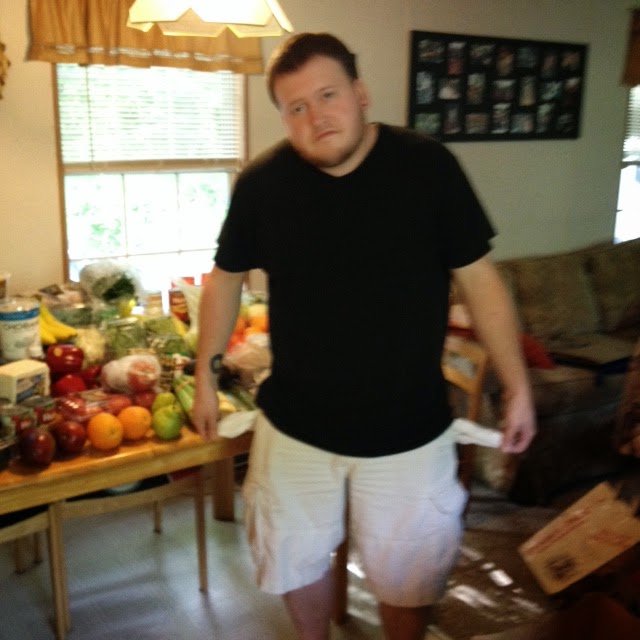
I won't throw out a number, but let's just say that this shopping trip was at least three times more expensive than our regular weekly, to bi-monthly trips - and this was just food, no toiletries, cleaning supplies, home goods included!

We did try to remind ourselves that this is every scrap of food we will be eating for a solid week (and then some) - we won't be making stops at the store on the way home after those "what do you want for dinner" conversations where we end up buying way too many things for one night, but not enough to satisfy the rest of the week's meals and we won't be going out to eat AT ALL.
J: "60 grocery items and not an Oreo in the bunch..."
But still, this is a cost-prohibitive menu for many; I know we couldn't do this year-round. I"m a bargain shopper - I will go from store to store and back looking for the best deal (we did that today to J's chagrin) and I was struggling to find products with suitable price tags. For example, at Harris Teeter I could hardly find any non-organic foods. They were all farm raised, free-range items that were at least 10% more expensive than their (absent) counterparts normally are.

And that's one of the biggest issues with food insecurity and health in the US. Fresh, unprocessed (read:good for you) food is much more expensive than junk food. While begrudgingly shopping (it went from fun to tiring quickly), we talked about how although it wouldn't be nutritious and certainly would lose it's deliciousness quickly, a loaf of bread, jar of peanut butter and some lunch meat would help a paycheck or SNAP (food stamps) go much further. And if you're in a tight spot, sometimes choosing between the dollar menu and organic produce has to be a choice about money.

Many areas are fighting this trend; farm gleaning projects bring fresh produce to food pantries, neighborhoods are starting community gardens and co-ops, and buying local CSAs provide reliable and less expensive produce, but in many places, these projects don't exist.

Which brings me to my next point. Clean eating is...potentially geographically biased. Another major issue with food disparities in the US is the undeniable presence of food deserts. Food deserts are places where "fresh produce is scarce and greasy food abounds." Think of big cities where the only sources of "groceries" are corner markets that are cramped and filled with non-perishable, processed items or rural areas where grocery stores are difficult to reach, especially without owning a car. This is a reality for many people and we were very aware of this while shopping. We actually drove an hour to Asheville where we knew we could find all of the ingredients we needed, and even then had to go to over four stores. There were many items we were skeptical about finding, and especially finding in good quality, quantity and pricing in our hometown. We stopped at our local grocer on the way home for goods we knew they'd have (at great prices) and saw some of the things we thought required a trip to Trader Joe's or Earthfare, but that isn't the reality for everyone.

Here are some of the items we didn't think we would find (or find affordable) in our town - quinoa, chia seeds, ground flaxseeds, tamari and medjool dates.


From the shopping trip alone, we can tell that this detox may also be... time consuming. There will be considerably more prep-time required as opposed to making Hamburger Helper or picking up a pizza. And while that can be another disadvantage for the working class, this detox plan does offer very detailed instructions for multi-tasking and make-ahead meals and freezer pouches.

But, so far, I can say my overwhelming feeling about clean eating is...excitement.  I do not doubt this will have challenging moments: some of these foods are not my cup of tea, and speaking of tea, J is already dreading going without coffee and only being allowed three cups of unsweetened green tea per day; and I think I may struggle with hunger. Yet, I'm still excited to try new things. I can honestly say that I've never made any of these recipes before and without the menu would never buy 30% of these items .


I think it's going to be fun, delicious, and most importantly, good for us!

Buzzfeed promises we'll feel like this when it's over..


We'll certainly share pictures of our moods - and dance moves - throughout the process! Stay tuned!