Showing posts with label favorite foods. Show all posts

Saturday, March 17, 2018

Take Them a Meal - Like Cheesy Chicken Enchiladas!

We have a new baby in our church family and last night J and I delivered the new parents a meal. I've written about the importance of and tips for meal delivery before, but since having a child of our own, this has become a real passion for me. Y'all, look around yourself and search for the new parents and offer them a meal. I promise you, "it takes a village" means more than helping raise a baby, it means making sure the harried parents are actually eating and eating more than just Easy Mac. The same goes for families in mourning, dealing with extended illness, or otherwise in crisis. 

I don't know this family very well (yet?), so we're just bringing dinner and sides tonight, but meal delivery can be so much more, especially if it's someone you're close to. As I mentioned in my previous post, after the birth of my niece we provided a few dinners, some breakfast items, snacks and all the fixins to make my in-laws' lives easier. 

It doesn't have to be a great production. Feeding people, I believe is my love language; I take so much pleasure in knowing that my hands produced something that will nourish their bodies, and maybe their souls. But just thinking about a person or family in need can be the thing that helps them keep their head above water. And those little extras are especially useful. 

How does that proverb go? Bring a mom a casserole and she'll have dinner for a single night. But bring her a casserole, some frozen pizzas, a pint of ice cream, a tub of cookie dough, freezable muffins, and a Stouffers lasagna and she'll actually retain her sanity during the first newborn sleep regression or bout of colic or postpartum hell. 


Let's go over a couple really easy tips to make meal delivery better for everyone:

     
  • Use recyclable or cheapo plastic containers. New mamas have zero time or brain cells to spend on remembering whose Pyrex is whose. 
  • Include idiot-proof instructions for reheating etc. Again, the brains of folks in are almost worthless at this point. 
  • Include all the working parts for your meal. If you're bringing bagged salad with your spaghetti, grab a bottle of dressing. If you're bringing frozen waffles, bring syrup, too. Who knows the last time they hit the store. 
  • And if you know they're going through a particularly trying time, with lots of visitors and little time (or money) for shopping, consider including a pack of paper towels, plates or plastic cutlery. 
  • If you're organizing repeated meals with a group, use a planning service like Take Them a Meal, where you can include specific instructions (address, preferred delivery time, dietary needs) and each volunteer picks their "shifts" and logs what they're bringing. Please don't bring 10 broccoli casseroles in a row. They aren't a sponsor of my blog, but I can't sing the praises of Take Them a Meal enough; it's a great help to the volunteers and the family expecting dinner. 

So we showered little Eli with some love and offered his parents a chance to sit down and eat a real meal. I'm used one of my favorite recipes, which is perfect for meal delivery and freezer friendly (so you could benefit, too!). 

For some reason, as a single twenty-something, I was subscribed to a Pillsbury mailing list for coupons and recipes (probably why I resemble the Doughboy a little more now). I found this chicken enchilada recipe way back when and realized, even when I was cooking for one, that it was a find. 

It's relatively inexpensive and the prep takes less than 20 minutes. It's so easy to prepare, I could probably stop pulling the recipe out. You make an enchilada sauce from the soup, sour cream, chilies and cumin; then mix in the chicken and cheese; roll your enchiladas and top with sauce. Since all of the ingredients are fully cooked, you only need to heat through and melt the cheese and it's done! 

I love this recipe because it allows me to be thrifty with my ingredients and really plan ahead. You know I love to pinch a penny and we try to be especially economical with meat. Your local supermarket deli likely reduces rotisserie chickens at the end of the day,  at our Walmart you can sometimes snag them for less than $3; or whenever you make "basic" chicken - like grilled or even fried chicken, without a lot of sauce or bold flavorings - you can shred/chop those leftovers and freeze in 2 cup portions. Having chicken on hand is perfect for soups, chicken salad, or enchiladas! 

And these enchiladas are HUGE and hearty. If I'm delivering a meal for 3+ family members, I usually buy the aluminum 8x8" pans with lids ($1 for two!) and it's a legit struggle to fit eight enchiladas in there. What I like to do at home is use my 8X4" narrow pans and make two packs of four enchiladas. This way, we have dinner tonight and a freezer pack for whenever we, or someone else, needs it. The small packs are perfect for little families, so having a couple of these waiting in the deep freeze is very convenient. And they do freeze beautifully. 

Since everything is fully cooked, you don't necessarily need to par-bake the dish (but you could, just for 15 minutes or so), then wrap thoroughly in foil. To prepare, thaw in the fridge the night before and then bake until hot (which does take a little bit longer than when everything's room temp). And for the love of Pete - WRITE THESE DIRECTIONS ON ALL YOUR FROZEN FOODS. 1. You'll know what the eff those stacked up aluminum pans are filled with and 2. you (or whomever you deliver them to; fresh or frozen) will know how to reheat. This is incredibly obvious and a total pain if you forget to do it...like I do ALL.THE.TIME. 

Courtesy of Pillsbury.com 

Even if you aren't planning a meal delivery and could care less about deep freeze meal prep, this is a great in-the-moment meal. The enchiladas feed a crowd, they're really flavorful - you really get the cumin and the chilies, and you can dress them up as much as you like with salsa, sour cream, guac etc. 

I like to serve mine with what my Venezuelan friend calls "Mexican salad" (now that's a sociology project for sure). It's greens and cucumbers topped with canned whole kernel corn, canned black beans (rinsed and drained), cheese, and crushed tortilla chips. For the dressing you mix a taco seasoning packet into ranch dressing. We're talking Taco Bell level of culinary accuracy, but it's so good. Who could turn down "fiesta ranch?" 

But in all seriousness, take a minute this week as you meal plan to see if anyone in your circle is hurting, stressed, totally drained or just in need of a night off from the stove. And offer to bring them a meal. Or a pie. Or a drop off a gift card to a local pizza joint. Your small amount of effort will make a huge impact on their life and show them how much you truly care. 


Wednesday, March 7, 2018

Winter 2.0: Time for Chili

Yup, daffodils & snow flurries. 

Remember last week when I was bouncing around in my sandals in the sunshine proclaiming that Spring was here? Well, then March started in like a lion with 50 mph winds and it snowed this morning. 


We should all be used to this already, North Carolina weather is notoriously fickle year-round. There have been years where I've worn short sleeves at Christmas and shivered through snow in my Easter dress. And I guarantee that those instances were met with drastically different weather the days before and after. It's just madness down here. 

So I'm officially withdrawing my Spring pronouncement and cancelling all spring menus until further proof of season-change is provided. I take back last week's bright surf 'n' turf salad and suggestions that you look for fresh produce and instead dive head first into warm, cheesy recipes. 

Let's start with a bowl of chili. 
I recently bragged that I was proud to have found two recipes to claim as my own; one for chicken noodle soup and the other for chili. I was saving my chili recipe so as to not give it away before my church's annual chili cook off; you know, because I was going to win. 

Spoiler alert: I didn't win, I didn't get honorable mention, but almost all of it was scraped out of the Crock Pot when we got ready to leave. It may not have won me another Summit Church title (still proud of being the Dessert Queen), but it is a tasty recipe. 

Chili is contentious. Folks like what they like and they don't want to deal with any nonsense outside of their chili definition. My dad's chili always has mushrooms, J's is made with beef and local sausage, a Texan girlfriend lives for no-bean chili. Up until recently, my chili loyalty went to whoever fed me the most (generally my dad #onlychildperks), but now I can boast a preference for my recipe. It started as a ground turkey chili, but is also good with lean beef; it's made with black beans; and you have to top it with green onions and sour cream. 

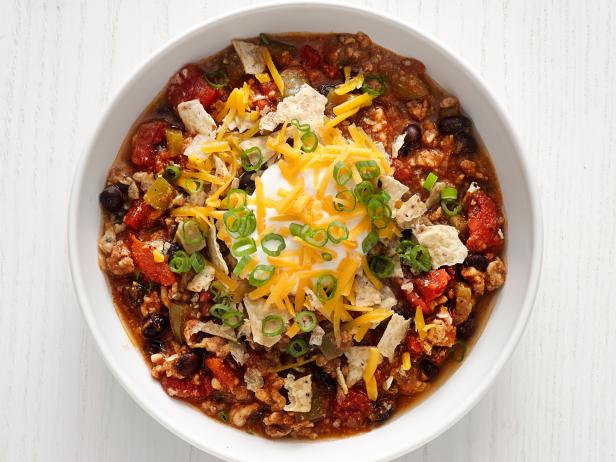
Because of my dad's kitchen sink chili - with meat, beans, tomatoes, mushrooms, peppers, and onions - I tend to drift to a chunkier style of chili. Some recipes are more watery (and I mean that in the best way possible) with fewer ingredients beyond meat and tomatoes. That's edging into soup territory for me, so I appreciate that this recipe has lots of bits and pieces and retains a heartiness. Plus, the "secret" or at the very least, unexpected, ingredient - crushed tortilla chips - thickens the liquid further and pulls all the flavors together.

Photo courtesy of Food Network magazine

Food Network magazine, who originally produced what I'm now calling "my" chili, called this recipe "Quick Turkey Chili" and they were spot on. This recipe takes hardly any time and only one pot to prepare. 

Several years ago, I was the Fellowship Coordinator at our church and I had to organize all our monthly meals, including the Chili Cookoff. I remember a lady rushed in right before church started. She'd had a family emergency the night before and was frantically making her chili in front of me. She threw canned veggies, tomatoes, spices (including a Hidden Valley ranch packet?!?) into a Crock Pot, cranked it to High and left it to simmer for the hour-long worship service. And she won. By a landslide, according to our judges. I've rolled my eyes at that performance for years, but now, my recipe doesn't take much more effort. 

First you muddle the tomato paste and spices together to make a really aromatic lump, for lack of a better word, to create a flavorful base. You then literally dump everything else in to cook off (like your raw meat) or to simmer and meld together. The starch from the tortilla chips acts as a binder and pulls everything together as it simmers. Then you add a punch of flavor with some extra green onions. It couldn't be easier. Unless of course it was... but you have to be extra thoughtful in your grocery shopping and meal prepping. 

As you may know, J & I are on different work schedules which saves us a bundle on day care costs, but also means we have to be incredibly organized in our meal planning for everyone to eat healthy, homemade food. To do so, we plan out a week's worth of lunches and dinners and make one big weekly shopping trip (goal: bi-monthly or even monthly shopping excursions). We peruse sale papers; make monthly trips to a bigger city to hit Aldi, Trader Joes, and/or Sam's Club; and try to get the best deals on what we think are smart purchases. We try to stick to our weekly lists, but especially on our monthly Asheville trips, we'll stock up on items that are on a good sale or we know we'll use.

You have to be smart and think big picture. If peppers are on sale [often Aldi will have them for $1.50/3-pack (even the more pricey colored ones!)], buy several to bring home, dice, and freeze in one-pepper-portions for later. In dishes like chili, peppers will be soft anyway, you don't lose any texture by pre-freezing (and you won't need to thaw them, either). 

Also, this recipe (and most soup recipes) makes around a half-gallon of finished product. I divide it right away into freezer-safe quart containers (these are 50 cents each at Dollar Tree or use freezer bags and lay flat on cookie sheets in the freezer, then you can stack them like books!). One quart usually feeds us for a lunch and dinner apiece (plus a baked potato) and I can immediately freeze the other quart for later. 

If you think making this chili is fast, you won't believe how fast it is to just thaw a quart! 


Sunday, December 14, 2014

More Bang for Your Buck at The Dollar Tree

Today I made my pre-Christmas grocery list and because I was dying to get in the holiday spirit even more, I added the items needed to make some of our favorite Christmas staples, plus some good food gifts.

I knew I wanted to make my boss his favorite linzer tart cookies, they were a big hit last year and his sweet tooth has only gotten more ferocious in 2014.


The old fashioned apple stack cake I made for Thanksgiving was requested again for our employee potluck on Wednesday.

There's no rain in sight, so the humidity is just right for J to make the old family recipe for delectable peanut butter fudge.

And it's just not Christmas until we break out two of my mom's classic recipes - peanut butter sandwich cookies (gluten-free and only 4 ingredients!) and spiced hard candy.


Mom's hard candy takes a certain touch - no candy thermometer used here, just the "feel" of the molten sugar - and is not for the faint of heart. We used to make batch after batch after batch when I was a kid and I'd pass it out to all my classmates and teachers. But as often happens, time got in the way of tradition and we haven't made any in years. So we had to initiate J into the cinnamon candy cult. 

At the "hard crack" stage

Cooling on a marble slab on our coffee bar (more on the "Dream Kitchen" later)

Our final product!

All of these projects made for quite the grocery list of ingredients, tools and containers. And I knew today's haul had the potential to be a bank-breaker; but we were able to save a ton at our local Dollar Tree.

I've been a devout customer since I started getting an allowance as a tween and realized I could buy 10x more tacky, glitter makeup there than at Wal Mart (the early '00s was an awkward time for girl fashion). But I was completely converted in college when DT started renovating their stores to carry a wider variety of higher quality goods - that were all still a dollar. I don't know if it was a stroke of genius or by necessity (what with the recession forcing more people to shop on a budget) but stores expanded to offer more food (even frozen items!), party supplies, bake wear and huge seasonal departments. Our town just renovated their location within the past two years and I couldn't be more grateful. 

DT offers great savings for so many aspects of my life: 
  • As a DIY wreath maker, I'm able to get good quality silk flowers and wire ribbon for, you guessed it, a dollar. 
  • I still write letters and the stationary at the Tree is wonderful and truly inexpensive; greeting cards are 2/$1! They even carry shipping supplies for when I send care packages to my adorable nieces.
  • Their kitchen department carries a number of handy items, from decent dinnerware to utensils perfect for taking to the office to disposable aluminum pans in a variety of sizes (these are perfect for pot lucks!); and even legit cake pans. 
  • I can't say enough good things about their food section. You can get name brand items for only four quarters! Most of the items are full-sized and obviously, a great deal - like cans of Hunts crushed tomatoes, bags of walnuts or packs of Hormel pepperoni. But, some of them are in smaller portions and are incredibly helpful for cooking-for-two or new recipes. For example, J's fudge recipe only needs 3 T of corn syrup, so there's no point in buying a giant bottle of Caro that will just make everything sticky; DT carries a little 8 oz. bottle. 
  • And the seasonal section is filled with adorable containers. Tins, snack bags, pails and boxes - for all your Christmas goodies! Just look at what we bought for our hard candy. Plus, I bought a snowflake-themed cardboard box for cookies. 

Today, we were able to buy over a third of the items on our list (plus some extras) at the Dollar Tree for only $16!

If you're looking to save some money, or just looking for quality, adorable items for almost any occasion, pop in to your local Dollar Tree and explore! You'll be amazed at how much you can get for your money... but also how quickly you'll fill your cart!

Sunday, July 13, 2014

Fat Kid Friday: Fresh Apple Cake

First, let me apologize for the fact that thus far, all my Fat Kid posts are about baked goods. I'm a baker - I am confident in my ability to make entrees, or whole meals, even - but I adore baking and creating desserts. So, for those of you lacking a sweet tooth, I'm sorry (but for those of you, like J, who can't get enough sugar, you're welcome).

Now, even if you aren't sweet savvy, this is a dessert worth a second look. I've been making this cake (and one other version of it) since I was a tween. My mom wrote the recipe for a church cookbook when I was a little kid and, for some reason, I gave it a try once. And according to my dad, this is my signature dish.

There's a local orchard whose opening we all count down to in the summer. They have great apples, the most phenomenal cider and cider slushies, apple donuts and fritters, and their infamous apple cakes. These apple cakes are beautiful and pretty good; and they better be, because they sell for upwards of $15. However, I've been making and selling these to family friends for years and they all say they're better than The Orchard's.


Fresh Apple Cake - prior to glazing
This cake is richly sweet from the apples, coconut, sugar and sauce. But unlike a more traditional layer cake, with creamy icing that coats the inside of your mouth, this is a sweetness more like a hyped-up fruit-and-nut bread. And technically, if you left off the glaze, it would be very bread-like, but who wants that? Since the glaze is made with brown sugar, it's not cloyingly sweet, but the molasses makes this more of a rich, caramel flavor instead of overpowering sweetness.

With coconut, three whole apples and a cup of pecans, the cake is full of chunks with different textures and flavors; which I love. You can use any number of apples, and if you're blessed enough to live in Western North Carolina in the fall, you have a long list of options. I think honeycrisp apples are pure perfection - best for juice, applesauce, baking, caramel or eating plain - and they are the most shelf-stable (kept in a cool place either a fridge or a cellar, a honeycrisp apple will keep for months). But you can use any firm type, without mealy flesh. If honeycrisp aren't available, I use granny smith apples. They are economical, readily available and flavorful.

Glazed & glossy


As we ease through the hot summer season toward fall, this cake is perfect for any gathering or meal (who needs a special occasion for cake?). It's delicious, inexpensive and easy-to-make - three of the best, and most important qualities for any dish!

Fresh Apple Cake 

Ingredients:
1 1/2 c. vegetable oil
2 c. white sugar
3 eggs
1 1/2 t. vanilla
3 c. self rising flour
1 t. cinnamon
1 c. shredded coconut (optional)
1 c. chopped pecans
3 c. raw apples peeled, chopped
1 stick butter
1 c. evaporated milk
1 c. brown sugar
1 t. vanilla

Method:

Preheat oven to 350.

Mix oil, sugar, eggs and vanilla in large bowl or stand mixer. Add sifted flour and cinnamon slowly; mix until well combined and scraping the bowl occasionally. Add pecans, apples and coconut, if desired. Spread into a greased and floured deep, large rectangular baking pan (at least a DEEP 9x13"). Bake until a toothpick entered into the center comes out clean, at least 30 minutes. If top browns but middle is still not done, cover with tin foil to not overly brown the top.

Melt better, and add milk, brown sugar and vanilla to a small pot and bring to a quick boil. Pour over cake while still hot. Allow to cool to warm, not hot before serving. Letting it cool allows the glaze to soak into the cake some. It's great served warm, room temperature or cold from the fridge.

Tuesday, March 18, 2014

Homemade Chinese Takeout

J and I love "exotic" foods (although probably Americanized versions of such). We love to try new foreign menu items (like Ethiopian on our honeymoon to DC last week) and we especially love Asian-inspired dishes.

We enjoy these foreign meals so much that we've been developing our own versions to make at home (like our Russian feast). We've made our own sushi and curries, and I think we've finally perfected our take Chinese takeout dish - sweet and sour chicken.

J's DIY California Roll Stogie
Jade Dragon is our go-to Chinese restaurant and we could easily spend $35 on a takeout order for the two us. Even though it is disturbingly delicious, I have absolutely no idea what is in our food other than the obvious (or alleged?) things listed in the title and description. My only assumption is that everything we usually order is either seared or deep fried in lots of oil; covered in equally oily, and salty sauces and the vegetables are cooked to near death. It's delicious, but not affordable for our wallets or our bodies.

This dish is just the opposite.

We've been on our honeymoon for the last week and of course, came home to an empty fridge; so we're trying to "make do" with our pantry and freezer stockpiles until we can get to the store. We do have a good stock of meats and vegetables in our freezers (we buy in bulk and freeze in appropriate portions) but nothing outlandish, and we were able to complete this whole meal without stopping at the market.

In addition to pinching some pennies, it also means, that for the most part (ketchup aside, probably), I know exactly what went into this dish and it contains very little oil - only enough for the initial sear, and no MSG. The dredged chicken is lightly browned in a small amount of vegetable oil, but the majority of the cooking is done in the oven which saves lots of calories. Also, this recipe makes for a ton of sauce - which would be the biggest calorie culprit - and you can easily use less and serve the sauce warmed on the side for dipping (FYI: dipping not pouring sauces, like salad dressing, onto dishes is a simple calorie saver. Humans are much too lazy to bother dipping each bite and will usually skip it).

I love the flavor profile of this dish. Unlike real takeout, which is doused in sauce to the point of not tasting the protein, you can taste all of the elements of this dish. It is sweet and it is sour, but it's also chicken and I appreciate being able to taste all of the parts in a beautiful union -not cloyingly sweet or super bitter. The browning adds a crispness that isn't hindered by the sauce and makes for a crunchy, but still saucy bite.


I will remind you that this is a takeout-based dish, so don't come looking for authentic Chinese cuisine. For starters, I have my doubts that "sweet and sour chicken" exists in traditional Chinese diets, and secondly, if it did, I'm sure it wouldn't involve ketchup or cornstarch. If you're looking for a true-to-China dish, check out Easy Chinese on the Cooking Channel. Ching-He Huan makes dishes that are legit, but she also takes the time to explain the history and visit restaurants, farms etc. that are keeping up the traditions.

Enjoy this recipe and I hope you're able to enjoy your own homemade takeout!

Baked Sweet and Sour Chicken

Ingredients:
3-4 boneless chicken breasts (around 1 lb), cut into 1x1" pieces
salt & pepper
2 eggs, beaten
vegetable oil
3/4 c sugar
4 T ketchup
1/2 c distilled white vinegar
1 T soy sauce
1 t garlic salt**

Method:

Preheat oven to 325. Lightly grease a glass baking dish (I use a 9x9" pan, but it's all based on how big your diced pieces are, you want to be able to lay them all in a single layer).

Season chicken with salt and pepper. Heat oil over medium/medium-high heat in frying pan. Dip chicken into cornstarch and then into eggs. Cook chicken pieces in pan until lightly brown on all sides, but not cooked through. Place browned chicken into prepared dish.

Mix sugar, ketchup, vinegar, soy sauce and garlic salt in a bowl with a whisk until sugar is dissolved. Then pour half of the mix evenly over the chicken. If you like a "wet" or saucy chicken, you can pour all of it, I prefer mine to be a bit stickier, so I gradually add more sauce throughout the cooking.

Bake for 30 minutes to an hour (until a meat thermometer in a large piece reads 160), flipping the chicken every 15 minutes (and re-evaluating sauce level, if needed). One pound usually takes around 45 minutes, but it depends on the cuts of the chicken and how crowded your pan is.

Serve with rice (homemade fried rice? yum!) and stir fried veggies.

**Note: I had a little flub today trying to throw this together (alliteration!) and used a tablespoon of minced garlic. Yes, that's a lot of garlic. And yes, it was delicious. If you love garlic, consider making this switch out. It's wonderful!

Sunday, February 2, 2014

Super Bowl 48 Snack-o-rama

I can remember watching the Super Bowl with my parents - dad, mostly - and betting 25 cents since I was five years old. I was only be interested in my bet and the Oscar Meyer weinermobile commercials, but in addition to the commercials and coins, I now almost understand the game, can appreciate the adorableness of the Manning brothers and most importantly, enjoy and prepare delicious game day food with my family.

Tonight, we had a super flavorful spread with old favorites and new, luxurious recipes. As usual, our minds and eyes were bigger than our bellies and we didn't even bother to complete the full menu after the first quarter but it was all delicious.

Jordan and I each contributed a slider. Jordan made his Mamaw's meatballs and sandwiched them on garlic butter toasted sweet Kings Hawaiian rolls with colby cheese squares. These meatballs - which are made with a top-secret recipe that has not yet been declassified for the blog - are hearty but with a sweet, onion sauce.Unlike a traditional meatball sub made with marinara, these sliders are sweet and tender that just make you wanting more. He used to make these into giant, entree-sized meatballs that we'd eat with sides like mashed potatoes or carrots. But we've found they make the perfect sandwich and are incredibly freezer-friendly.


I love wings and in recent months have had an insatiable hunger for bleu cheese and my buffalo'd chicken panini was a great take on the bar classic of wings and dressing. This was a quick dish that would be great for any game day or weeknight dinner and could be made with leftover chicken (a single $5 rotisserie chicken can provide a number of meal options if you plan your week carefully). Also, you can take this dish to several levels of diy. Originally, I would buy a refrigerated bread dough (like Pillsbury's French crusty loaf), cut it into eight chunks and roll them into flat rectangles, I would then grill them on my Cuisinart grill/griddle which results in a great, crusty, crunchy panini. However, to save time and to tone down the spiciness of the buffalo sauce, I opted for Kings Hawaiian mini sub rolls. This sandwich brings the best flavors of buffalo wings but it a whole lot less messy - and you don't have to eat a dozen to be satisfied. Recipe below!


Dad made crowd pleasing mini pigs in a blanket - no Southern party is complete without lil' smokies or crescent dough - and improvised turkey and Italian cheese pinwheels (more crescent dough); a delicious layered salad - another timeless Southern potluck dish (recipe below)- and for a healthy respite, some crudite and a creamy riff on guacamole. 


He also surprised us with a decadent lobster mac 'n' cheese. We're all mac lovers and none of us frequently eats lobster (we are six to nine hours from an ocean) so this was a real treat. Dad said it best, by saying "it's no longer macaroni and cheese." It was undeniably delicious but didn't resemble the childhood favorite, but was do deeply infused with crustacean it had become a new dish entirely. We've enjoyed it and checked it off of our food bucket lists. 

Lobstah Mac in the small dish; Mom demanded her own crustacean-free dish, too
And Jordan finished off our smorgasbord with his super easy and even more delicious dessert that I simply call " Oreo fluff." Fluff is a layered whipped cream and chocolate wafer cookie dessert with only 3-4 ingredients but tastes as good as any homemade cake or pie. This is a great dish to have your kids help with, to make in bulk for potlucks or in ramekins for individual servings. Every time we take it to church, our fellow parishioners all but lick the bowl! Recipe below!

Maybe next year we'll try the Mario Batali strategy - making two themed dishes per team and alternating them during each quarter, then he serves a dessert he prepared based upon his guess of which team would win. This spaces out the snacks and adds a little more order to the food fest - but then again, it's not a Super Bowl party without copious quantities of classic "unaffiliated" tailgating food. Whatever the plan - we'll report to you here at Endlessly Delicious Life.

Preliminary conclusion (11:34 left in the 4th quarter): Check out the trio of recipes below - and I promise that they're more dynamic than tonight's game. Well, actually, they are runaway successes too. Obviously, I put my quarter on Seattle.

Buffalo'd Chicken Panini

Ingredients: 

2 c cooked shredded chicken (I boiled mine in salted water for 45 minutes)
1/2 c mild to medium buffalo sauce (add melted butter as needed to tone down, I added around 2 T)
4 buns or rolls (or grilled dough method from above)
1/4 small red onion, sliced
1/3 c bleu cheese crumbles

Method:

Heat buffalo sauce (and butter, if added) on low until hot. Stir in chicken, heat until hot.

Spoon chicken mixture onto buns, layer red onions and sprinkle with cheese.

Press on a hot grill until heated through and cheese is melted. Serve with extra ranch or bleu cheese dressing if desired.

-------------------------------------------------

"Seven" Layer Salad - (technically, the toppings - cheeses/bacon - count as one item)

Ingredients*: *in "layer" quantities - they depend upon your bowl size

shredded iceberg lettuce
peeled, sliced cucumber
thinly sliced sweet onion (ex: Vidalia)
chopped boiled ham (or ham lunchmeat)
frozen baby peas
mayonnaise
grated Parmesan cheese
crumbled bacon
shredded cheddar cheese

Method:

Simple - layer the items (lettuce first) in your dish. Use a clear, deep bowl for a beautiful presentation.

---------------------------------------------------

Oreo Fluff

Ingredients:

1 - 1 1/2 packs of chocolate wafer cookies (you can use double stuff, vanilla or chocolate cream), crumbled
32 oz. whipped cream, thawed
approx. 1/2 c milk
chocolate syrup (optional)

Method:

Cove the bottom of your dish with a layer of crumbled cookies - the thicker your cookie layer the more cake-like consistency you'll have. Carefully pour just enough milk on the cookies to dampen them slightly. For chocolate lovers - add a drizzle of chocolate syrup on top. Next, layer whipped cream. Repeat to finish with cookie crumbles on top. Chill at least a few hours. The longer you leave it in the fridge the softer it becomes - it just gets better!

Saturday, December 21, 2013

Cookie Swap Part 2: Four-ingredient gluten-free peanut butter cookies

Getting ready for tomorrow's cookie swap at my Grandma's I've been making last week's linzer cookies and my mom's standby peanut butter cookies and fudge sandwiches.

If you're in a pinch for time and don't want to spend a lot of money on dried fruits, chips and oats try this four-ingredient recipe. It's quick, easy, and gluten-free. I have two family members with celiac disease (gluten intolerance) and this recipe is great for them without sacrificing any flavor.

Like most peanut butter cookies, these are dry not gooey and with the optional fudge filling make for a great sandwich. And of course, who doesn't love the classic combo of peanut butter and chocolate? From my unprofessional research into the vast universe of pre-made icings, most canned frostings are also gluten-free.

I hope you enjoy this recipe for your own cookie swaps or other special occasions - I actually made these in lieu of a cake for Jordan's birthday two years ago, and yes, I do think they played a special part in our love story. Take that, engagement chicken.


Peanut Butter (Fudge Sandwich) Cookies

Ingredients:

1 c peanut butter 
1 c granulated sugar
1 large egg
1 tsp vanilla extract
1 container chocolate icing of your choice (optional)

Method:

Preheat oven to 350. Mix peanut butter, sugar, egg and vanilla with a hand mixer. Scoop dough into tiny balls and place on a cookie sheet. Use a fork dipped into sugar to press an x into each cookie. Bake for 8 minutes. The cookies will seem underdone, but as long as the edges are lightly golden brown, they're done. They'll seem very soft, but will cool to the perfect texture. 

After they've cooled spread approximately 1 T icing between two cookies. If you're really trying to impress - swap the icing for only the best spreadable condiment ever, Nutella!

Note: These are great served at room temperature, but even better eaten from the fridge or after a few hours in the freezer. 


Wednesday, November 27, 2013

Thankful for Bountiful Thanksgiving Meals

I am only child; Jordan is the eldest of six from two blended families.

My families usually had two to three Thanksgiving gatherings spread out over a two week period. Once I started jonesing for turkey and dressing (Southerners DO NOT eat or make "stuffing") there was another family meal right around the corner - dad's family, mom's family and then just us three.

With the uniting of our families, I now have three meals in one single nothing-but-stretchy-pants day. Last year we tried spreading it out as much as we could, but in 2013 we're going back-to-back with Jordan's families and mine. And it's going to be delicious!

We are cooking for two of the three meals; for lunch at Mamaw J's, Jordan is bringing his new favorite sneaky dessert, mock apple pie (recipe below - seriously tastes like magnificent apple pie but is made of Ritz crackers!) and at our late evening meal at home with my parents, I'm making twice baked sweet potatoes (recipe below) and roasted cauliflower (recipe below) and Jordan's making his glazed carrots. (I'll post an update tomorrow with pictures, too!)

I anticipate traditional food at Jordan's Mamaw's and Paw's celebrations, but we're going to be deconstructing our traditional sweet potatoes, turkey and gravy meal with my parents and experimenting a little. My dad is going to smoke some parts of the turkey - either just a breast or the whole damned thing, I'm trying a new sweet potato dish instead of casserole with streusel and opting for the cauliflower instead of green beans (not in a casserole, bleh!).

I'm really excited for this meal that is a departure from our normal Thanksgiving fare, but there are some foods that just scream Thanksgiving and I certainly hope we get tomorrow.

Jordan and I are both in the pro-cranberry sauce camp. I love it - fresh, out of the can with or without whole berries - I could eat it by itself. I actually have a serious weakness for turkey and cranberry combinations; twice in the last year we've tried a new restaurant and I picked out what I wanted, saw that they offered a hot turkey/cran sandwich and  jumped ship on my earlier choice.

We are also lovers of pumpkin pie. Pumpkin pie has apparently become the most sought after flavor starting September 1, and I actually foundered Jordan on pumpkin-filled things (including ravioli, alfredo sauce, muffins and cakes) this fall; but we both can't get enough of the pie! And another sign of our true love, Jordan gives me the crust from his pie slices - so romantic!

And I need dressing. Again, not stuffing - who wants to eat bread out of a bird orifice? Our recipe has been tinkered with for so long, I hardly remember it's original version that my Aunt Debra made at least ten years ago. Like so many of our family recipes, nothing is measured and you can add more or less ingredients depending on what's in your pantry. It's basis is cornbread and stale French bread, browned sausage, sage, thyme, chicken broth, diced apples and pecans. Some years we add pears or craisins, but it turns out wonderful every time. I'd probably be happy with a plate of dressing and cranberry sauce.

I've finished my grocery shopping, cleaned the house, laundered the place mats and napkins and will be starting my prep shortly. I always look forward to Thanksgiving - it's a legitimate foodie holiday - and the wonderful self-awareness and gratefulness it brings with it. I am grateful that I have a wonderful family and future husband to spend my holidays (and every day) with; that we are comfortably employed and can afford to take the time to be together, to buy ingredients and cook meals; and that we are in good health to visit with each other. I am grateful for you, readers, and hope that you have a wonderful holiday and a delicious meal with those you love.

And here are the wonderful recipes you were waiting for:

Mock Apple Pie: This recipe originated in the Great Depression when apples were too expensive and in short supply; it tastes eerily like apple pie and is a wonderful, warm seasonal dish that epitomizes Fall. My dad used to make this when I was a kid; I told Jordan about it and he didn't believe that such a thing could exist - now he's hooked on them!

Ingredients: (10 slices)

2 unbaked pie crusts (you're welcome to make your own, too)
36 original Ritz crackers (don't go generic, and don't make the mistake of picking up the flavored ones), coarsely broken (about 1-3/4 cups crumbs)
1-3/4 c water
2 c sugar
2 tsp cream of tartar
1 T lemon juice (2T is in the recipe but this makes it too lemony for us)
zest of 1 lemon
2 T margarine or butter
1/2 tsp cinnamon

Method:

Preheat oven to 425.

Roll out pastry into a 9-inch pie plate. Place cracker crumbs in prepared crust, set aside.

Heat water, sugar and cream of tartar to a boil in saucepan over high heat. Simmer for 15 minutes. Add lemon juice and zest; cool. Pour syrup over cracker crumbs. Dot with marg/butter, sprinkle with cinnamon. Roll out second pastry; place over pie - trim, seal and flute edges. Slit top crust for steam.

Bake for 30-35 minutes or until crust is crisp and golden. Cool completely -This step is critical. Without proper cooling, the filling will not set up properly and will be very runny. It is delicious served slightly reheated with vanilla ice cream melting on top.

--------------------------------------------------

Twice Baked Sweet Potatoes-  To me, this is a great alternative to sweet potato casserole and gives each person their own dressed-up sweet potato. This is also a good make-ahead dish where you do the initial baking, make the filling and either leave them separate and assemble and reheat later or pre-assemble and warm later.

Ingredients (for 6):

6 medium sweet potatoes (8 oz. each)
1/2 c butter, cubed (this can easily be lessened, it's about the flavor and texture you want- start with 1/4 and go from there)
1/4 c packed brown sugar
1 medium apple chopped (I used a peeled honeycrisp - which are undoubtedly the best apples ever - but it's up to you)
1/4 c chopped pecans

Method:

Preheat oven to 400. Scrub and pierce potatoes with a fork. Place on a foil lined baking pan. Bake 45-60 minutes or until tender - check at 45 min.

When cool, cut a thin slice from the top of each potato, discard. Scoot out pulp, leaving 1/4" shell, transfer pulp to medium bowl. Mash with butter and sugar, stir in apples and pecans.

Spoon into potato shells. Return to baking pan. Bake 15-20 min. or until heated through.

 ------------------------------------------------

Roasted Cauliflower: This dish is incredibly simple and is a wonderful side. It has quickly become a last-minute side and I can mix the ingredients in my sleep and with only two real steps, it's just as easy to finish.

Ingredients: (for 4 large servings)

1 large head of cauliflower, broken into florets
2 Tbsp. olive oil
1 tsp. smoked paprika
3/4 tsp. salt
2 Tbsp. minced garlic
2 Tbsp. minced fresh parsley (or 1 Tbsp. dried)

Method:

Preheat oven to 450.

Place cauliflower in large bowl. Mix oil and spices in small bowl. Drizzle over cauliflower; toss to coat. Transfer to large baking pan.

Bake uncovered for 10 minutes. Remove from oven, stir. Return to oven and bake for 10-15 minutes or until cauliflower is tender and lightly browned, stirring occasionally.


CLICK HERE FOR PHOTOS OF THE FINAL PRODUCTS!


Sunday, November 10, 2013

Hidden Local Gem: Mindy's Cuban Restaurant

Jackson County, NC doesn't strike me, a native, as a culinary wonder and I do struggle to think of "great finds" to share with friends who visit. However, a recent addition - or expansion, really - is quite the gem.

Around a year ago, a bakery opened in one of the most poorly designed shopping centers known to man (this strip of shops is tucked behind the Zaxby's drive-thru with limited parking and visibility from the main road). Mindy's Bakery was owned by a Cuban family who made wonderful desserts from scratch. They offered giant slices of a variety of cheesecakes, puff pastries like eclairs and cream horns, custom cakes and a variety of sweets. I'd been there a few times but it was so out-of-the-way I often forgot about it, and then, like too many shops that have been sucked into the strip, it disappeared. 

But, this weekend, we found them again! They have moved and expanded to be not just a bakery, but a Cuban restaurant serving six+ entrees, a variety of Latin sides and their wonderful desserts. And this is exciting for several reasons: 
  1. The desserts at Mindy's Bakery were great - who doesn't love scratch-made flan?
  2. Jordan works at a deli whose signature sandwich is a Cuban (traditionally includes roasted pork, ham, mustard, pickles, crusty bread - all hot pressed) and we love to try other versions, especially authentic ones
  3. The owners are a husband and wife team whose children run the front-of-house and one of the youngest (of their12 children), Andres, was recently a contestant on "The Next Food Network Star" which we watched religiously. We've spotted Andres around before, but never had a chance to talk to him, much less try his/his family's food.
For the locals, Mindy's is now located in East Sylva Shopping Center (why there are directional districts in a town of less than 30,000 I'll never know) beside Jack the Dipper and Robbie's Charburger. It's a discreet location but they have brought Caribbean brightness to the area. The door is painted a vibrant turquoise and there's vintage patio furniture and colorful benches outside. The interior of the restaurant features just as much Cuban flair with bright colors, vintage furnishing and fun retro styling with sheet metal. 

They focus on simplicity and authenticity at Mindy's. As I said before, their menu is small with three "meat entrees" and three sandwiches, along with sides like tostones, sweet plantains and beans and rice. We both ordered traditional Cubans with beans and rice that were made to order by the husband and wife. While we waited, we had a great talk with whichever chef wasn't manning the cook top at the time. Jordan and the owners discussed the finer points of Cuban sandwiches and I told them how I was already planning to come back to order tostones. 

Our $7.50 sandwiches arrived and were delicious and huge. In the traditional three compartment clamshell, they filled the large section to the brim with fresh black beans and rice, while the gigantic sandwich covered the other two compartments. And after hearing about my love of tostones (which are plantains that are fried, smushed flat and then fried again) they gave us a free order of the biggest, most flavorful tostones I've ever had. So my first suggestion for your trip to Mindy's: bring your appetite or a friend to share your meal with. 

They explained to us that they make their Cuban pork each day and marinate it in a homemade sauce, which they gave us a side of for taste-testing and tostone-dipping (ask for it!). The sauce is a tangy, garlic and citrusy blend that we think gets its body from tomatillos (since they were already talking shop with us, we didn't get too nosy about secret family recipes). While the flavoring is different, their pork reminded me so much of pork my family would can at home. It fell apart with the slightest touch and tasted like it had been cooked slowly with care.

Their bakery case is still impeccable; I can't wait to try the "flan-cake" that looks like a tres leches/flan hybrid! And they still do custom cakes and will be making some great dishes for Thanksgiving and Christmas (one will be a pecan caramel cheesecake pie!). And they're fine tuning their offerings and menu and will hopefully be adding some other traditional treats like Cuban coffee. 

Mindy's is only open Wednesday- Saturday (11:30 a.m. to 8:30 p.m.) because the owners are full-time students, so get your Cuban fix while you can. We arrived right after opening on Saturday and mostly had the dining room to ourselves which gave us a lot of time to talk to the owners about their restaurant, their family and their food. And my second tip, straight from the owner: don't let their serious expressions fool you, they love to talk and are super friendly. As we were finishing up, more people started filtering in and placing huge orders and they had a sincere talk with everyone. 

I'm a full supporter of small businesses and want to see this family and their love-filled restaurant succeed. If you're a local or live or are traveling through Western North Carolina in general (I doubt there are five Cuban shops in all of WNC) pop into Mindy's. They are cooking their culture with their children and sharing inexpensive, huge, flavorful meals with their community.