Showing posts with label apocalyptic winter. Show all posts

Wednesday, March 7, 2018

Winter 2.0: Time for Chili

Yup, daffodils & snow flurries. 

Remember last week when I was bouncing around in my sandals in the sunshine proclaiming that Spring was here? Well, then March started in like a lion with 50 mph winds and it snowed this morning. 


We should all be used to this already, North Carolina weather is notoriously fickle year-round. There have been years where I've worn short sleeves at Christmas and shivered through snow in my Easter dress. And I guarantee that those instances were met with drastically different weather the days before and after. It's just madness down here. 

So I'm officially withdrawing my Spring pronouncement and cancelling all spring menus until further proof of season-change is provided. I take back last week's bright surf 'n' turf salad and suggestions that you look for fresh produce and instead dive head first into warm, cheesy recipes. 

Let's start with a bowl of chili. 
I recently bragged that I was proud to have found two recipes to claim as my own; one for chicken noodle soup and the other for chili. I was saving my chili recipe so as to not give it away before my church's annual chili cook off; you know, because I was going to win. 

Spoiler alert: I didn't win, I didn't get honorable mention, but almost all of it was scraped out of the Crock Pot when we got ready to leave. It may not have won me another Summit Church title (still proud of being the Dessert Queen), but it is a tasty recipe. 

Chili is contentious. Folks like what they like and they don't want to deal with any nonsense outside of their chili definition. My dad's chili always has mushrooms, J's is made with beef and local sausage, a Texan girlfriend lives for no-bean chili. Up until recently, my chili loyalty went to whoever fed me the most (generally my dad #onlychildperks), but now I can boast a preference for my recipe. It started as a ground turkey chili, but is also good with lean beef; it's made with black beans; and you have to top it with green onions and sour cream. 

Because of my dad's kitchen sink chili - with meat, beans, tomatoes, mushrooms, peppers, and onions - I tend to drift to a chunkier style of chili. Some recipes are more watery (and I mean that in the best way possible) with fewer ingredients beyond meat and tomatoes. That's edging into soup territory for me, so I appreciate that this recipe has lots of bits and pieces and retains a heartiness. Plus, the "secret" or at the very least, unexpected, ingredient - crushed tortilla chips - thickens the liquid further and pulls all the flavors together.
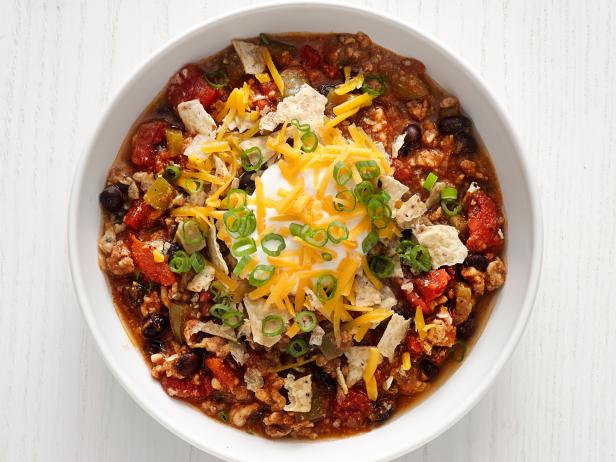
Photo courtesy of Food Network magazine

Food Network magazine, who originally produced what I'm now calling "my" chili, called this recipe "Quick Turkey Chili" and they were spot on. This recipe takes hardly any time and only one pot to prepare. 

Several years ago, I was the Fellowship Coordinator at our church and I had to organize all our monthly meals, including the Chili Cookoff. I remember a lady rushed in right before church started. She'd had a family emergency the night before and was frantically making her chili in front of me. She threw canned veggies, tomatoes, spices (including a Hidden Valley ranch packet?!?) into a Crock Pot, cranked it to High and left it to simmer for the hour-long worship service. And she won. By a landslide, according to our judges. I've rolled my eyes at that performance for years, but now, my recipe doesn't take much more effort. 

First you muddle the tomato paste and spices together to make a really aromatic lump, for lack of a better word, to create a flavorful base. You then literally dump everything else in to cook off (like your raw meat) or to simmer and meld together. The starch from the tortilla chips acts as a binder and pulls everything together as it simmers. Then you add a punch of flavor with some extra green onions. It couldn't be easier. Unless of course it was... but you have to be extra thoughtful in your grocery shopping and meal prepping. 

As you may know, J & I are on different work schedules which saves us a bundle on day care costs, but also means we have to be incredibly organized in our meal planning for everyone to eat healthy, homemade food. To do so, we plan out a week's worth of lunches and dinners and make one big weekly shopping trip (goal: bi-monthly or even monthly shopping excursions). We peruse sale papers; make monthly trips to a bigger city to hit Aldi, Trader Joes, and/or Sam's Club; and try to get the best deals on what we think are smart purchases. We try to stick to our weekly lists, but especially on our monthly Asheville trips, we'll stock up on items that are on a good sale or we know we'll use.

You have to be smart and think big picture. If peppers are on sale [often Aldi will have them for $1.50/3-pack (even the more pricey colored ones!)], buy several to bring home, dice, and freeze in one-pepper-portions for later. In dishes like chili, peppers will be soft anyway, you don't lose any texture by pre-freezing (and you won't need to thaw them, either). 

Also, this recipe (and most soup recipes) makes around a half-gallon of finished product. I divide it right away into freezer-safe quart containers (these are 50 cents each at Dollar Tree or use freezer bags and lay flat on cookie sheets in the freezer, then you can stack them like books!). One quart usually feeds us for a lunch and dinner apiece (plus a baked potato) and I can immediately freeze the other quart for later. 

If you think making this chili is fast, you won't believe how fast it is to just thaw a quart! 


Friday, May 16, 2014

Fat Kid Friday: Classic Yellow Cake

For our second installment of Fat Kid Friday, I'm bringing you the delicious, ridiculously tall and rich yellow cake I made for J's birthday.


J's family loves birthdays - they get together for EVERY family member's birthday and there's store bought cake and ice cream and chips every time. I have always been a cake person, but this new, almost monthly serving of birthday cake has increased my love of cakes. This year, I started asking J what kind of cake he wanted early on and while leafing through my "Martha's American Food" cookbook he pointed to a beautiful yellow four-layer cake with chocolate buttercream.

This cake was an undertaking - not because the recipe was hard but it was such an exquisite cake to live up to. And it was a whole hell of a lot butter. But - despite it being a messy, butter-filled endeavor - this cake tastes like childhood. It tastes like the cakes mom and grandma used to make. My grandma makes the best yellow cake with a thick fudge icing. I remember peeling off the fudge and either shoveling it down as fast as I could or saving it for the very last bite (this patience came with age). This cake is a close second to that with a creamy smooth frosting and a sweet, buttery (duh!) cake.

And this recipe makes more than enough icing. I saved some in the fridge and it's an exact replica of Ice Cube candies (if you've never tried one, hit up your local retro candy store, like Mast General Store).

I highly suggest you stocking up on butter and whipping this up for your next special occasion!

Fun Tip: LEGO minifigures make the perfect candle holders!
Just sit them on a little piece of tinfoil so they don't get icing in their legs. 


Yellow Layer Cake with Chocolate Icing

Cake Ingredients:

1 cup (2 sticks) unsalted butter, plus more for pans
1 1/2 c all-purpose flour, plus more for pans
1 1/2 c cake flour (not self rising, I used Swan's Down)
1 T baking powder
1/2 t salt
1 3/4 c sugar
4 large eggs
2 t pure vanilla extract
1 1/4 c milk

Method:

Pre-heat oven to 350. Butter two 8x2" cake pans, line bottoms with parchment. Butter parchment and dust with flour, tap out excess (TIP: if you're making a chocolate cake use cocoa powder to dust your pans).

Sift together flours, baking powder and salt into a medium bowl.

With an electric mixer on medium speed, cream butter and sugar until pale and fluffy. Beat in eggs, one at a time, then beat in vanilla. With the mixer on low speed, add the flour mixture in three batches, alternating with the milk and beginning and ending with the flour, beat until combined after each addition.

Divide the batter between the pans and smooth with a spatula. Bake, rotating pans halfway through until tops are tender and a toothpick comes out clean (this is a delicate cake that's easy to over-cook, watch them closely) - about 30 minutes. Let cool in pans on a wire rack for 20 minutes. Run a knife around the edges and flip onto rack. Let cool completely, top sides up.

Using a serrated knife or bakers garrote trip tops of the cake to make level. Split each cake horizontally to make four layers. Place bottom layer on a serving platter and spread with frosting. Place another cake layer on top, spread with frosting. Repeat twice. Spread a thin - crumb coat - on the entire cake, refrigerate until firm. Spread with a final layer of frosting. Refrigerate cake at least 1 hour until slicing. (Cake can be made up to 3 days ahead. Cover and refrigerate; let sit at room temperature before slicing and serving).

Icing Ingredients:

1 1/2 lbs semisweet chocolate, finely chopped
1/2 c plus 1 T unsweetened cocoa powder
1/2 c plus 1 T boiling water (great use of the Keurig!)
1 lb plus 4 T (4 1/2 sticks) unsalted butter, softened
3/4 c powdered sugar
pinch of salt

Method:

Heat chocolate in a double boiler, stirring occasionally until completely melted - about 15 minutes. Remove from heat and let cool to room temperature, 25-30 minutes. Meanwhile combine cocoa and boiling water, stir until cocoa is dissolved.

With an electric mixer on med-high speed, beat butter, sugar and salt until light and fluffy. Add melted chocolate, beat on low speed until combined - 1 or 2 minutes. Beat in cocoa mixture.

Monday, February 24, 2014

Meatball & Tortellini Soup

This month's church fellowship was a Soup & Pie luncheon. How much more homey can it get than a warm bowl of soup and a sweet slice of pie? For the meal, I brought a new, fresh-tasting soup with vegetables, meatballs and tortellini (and my classic peanut butter pie - but I'm not ready to share that one yet).

It's a light soup (less than 500 calories/serving) - with low-sodium broth instead of a cream base, fresh vegetables and flavorful, caramelized meatballs. Like chicken noodle soup, this recipe is hearty without feeling heavy or overly rich. The light saute on the veggies gives them a firmer texture that makes for a satisfying bite. And the meatballs don't become dry but the quick browning gives them deeper flavor.


This one-pot soup made for quick prep and worked really well for the potluck because I was able to do 90% of the work the night before then only had to reheat and add the last two ingredients quickly at the end. It also kept well in the Crock Pot - if you have a CP with a locking lid, you're golden with this dish! 

This is also another great opportunity to bring your kids in the kitchen. This could be good for youngsters - even toddlers - who like getting their hands dirty (and know not to touch their mouths during or after) and want to help with the meatballs; but would be especially good for a young kid - I'm thinking 7 or 8 - who can manage simple cuts and would be able to sear the meatballs. Soup is a great place to start teaching your children how to cook because they're fairly inexpensive (this was less than $2/serving and most of the ingredients are pantry staples), so little can go wrong and they are such improvisational dishes - got a little too overzealous with the stirring? Fine. Ground meat instead of meatballs would be fine. No stress!

Grab a bowl and ladle yourself a great big helping of this delicious soup!


Meatball & Tortellini Soup

Ingredients:

8 oz. ground beef
1/4 c grated Parmesan cheese
1/4 c chopped fresh parsley (or 2 T dried herbs -- I used Italian seasoning)
1 large egg
1 clove garlic, minced
kosher salt, ground pepper
2 T extra virgin olive oil
2 carrots diced
2 stalks celery, with leaves, diced
1 quart (two 16-oz cans) low sodium chicken broth*
9-oz package refrigerated cheese tortellini*
4 c loosely packed baby spinach

Method:

Combine beef, cheese, half of the parsley or herbs, egg, garlic, 1/2 t salt, and pepper to taste in medium bowl. Mix with your hands until just combined - over mixing will make your meatballs tough. Form into small meatballs (1" at the biggest, I made mine miniature so I had about 24+). 

Heat the oil in a pot or Dutch oven over medium-high heat. Add the meatballs and cook, turning over when golden - until all sides are lightly browned (3-4 minutes, faster for smaller meatballs). Remove the meatballs to a plate. 

Add the carrots and celery and cook in the pan drippings until just softened. Add the broth and 3 cups of water; bring to a boil. Return the meatballs to the pot along with the remaining herbs and 1/2 t salt; simmer until the meatballs are just cooked through (about 2 minutes). Note: if you are making ahead - stop here and refrigerate until 15 minutes before serving and then bring back to a boil.

Add the tortellini and cook until they float to the top, about 4 minutes*.Note: if you are making this soup for only 1-2 servings instead of the full four, only make the fraction of the tortellini you need at the time. If pasta is stored for long periods of time, it absorbs liquid and becomes soggy. Add fresh pasta for each later serving. Add the spinach and cook, stirring until wilted. Season with salt and pepper. 

*Note: You can use dried tortellini as well (I did). If you do this, use an 8 oz. package (I used Barilla three cheese) and add another 16 oz. can of chicken broth. You'll need to cook the tortellini longer (about 8 minutes) and they will absorb more liquid. Keep an eye on it and you may want to add more water or broth if your soup looks too "thick," with little broth. 


Thursday, February 13, 2014

Brown Butter Oatmeal Cookies with Chocolate Chips and Peanut Butter

I have a love/hate relationship with cookies.

I would say that I am more apt to and better at cooking sweets and even though J has the bigger sweet tooth, I enjoy trying new desserts and baked goods. However, cookies are on the bottom of my "love to bake" list.

I know of very few other dishes that are so deceptive. Cookies are a culinary catch-22.  "Bake until the edges are golden brown" is incredibly vague and I usually debate "is the middle raw?" until the golden brown edges indicate a dark brown bottom. And, they're one of the few items that can completely change consistency - for the worse - in a matter of minutes AFTER they're cooked. A golden-brown-edged cookie that is so tender on the pan can be hard as a rock when cooled. So essentially, I should be pulling them out when the centers are raw so that maybe they'll have a chance to be soft later on.

All that ranting aside, we had an almost 24-hour snowstorm yesterday and it may be a relic behavior from our prehistoric days, but severe weather makes me insatiably hungry. I knew I needed to bake.
Seven inches of beautiful snow!
 J'd bought groceries on Monday but didn't include my snowstorm, junk food staples; so I was working on random pantry items. Amazingly, I found a recipe that allowed me to finish off three near-empty baking supplies and made a delicious new treat.

These cookies are fairly simple, but do require some time. Making good brown butter is easy but needs constant attention. I've eaten dishes cooked in/with brown butter and the time and cooking really does add a noticeable flavor difference - it makes for a deeper, nuttier, heightened flavor. As Carla Hall says on The Chew, when cooking, the flavor is in the brown!

I'd never made my own brown butter before and learned a few tricks. For more info visit this article and video tutorial. 

  • This should be obvious, but isn't - make your brown butter in a light colored pan. Dark, anodized pans will prevent you from telling if your butter is still yellow, brown, or burnt. Duh!
  • Slicing the butter into tablespoon-sized chunks will move the process along faster than dropping in an entire stick.
  • Be patient and constantly stir - this can go bad QUICKLY. Stir, stir, stir and keep an eye on the color. Again, this will sound like deceptive cookie talk but when it starts to turn light brown, go ahead and pull it off of the heat or it will black quickly. 

Also, this recipe was originally intended to have a caramel center (the dough "wrapped" around a melting caramel square) but we don't do a lot of caramel in the house and thus didn't have any in the pantry. I thought I could do the same and have a melty ball o' chocolate in the middle, but that is far too time consuming. I would suggest that you can add some mix-ins like nuts or chocolate chips, but stir them in at the end before chilling, this will save a lot of time and effort - and will essentially turn this into a low-maintenance drop cookie.


I love oatmeal cookies because they're so much more hearty. They feel more stout and to me, more homey. They feel more like something my grandma would give me than a super sugary, no-filler cookie. This recipe is for a well-balanced cookie. All of the components blend so well together to create a cookie that isn't over-the-top in sweetness, nuttiness, chocolate or texture - to me, they're just right. They are just sweet enough- by mixing brown and white sugars they have a depth of sweetness from the molasses that just makes you all warm inside (as opposed to sugar high). And the dollop of peanut butter on top adds a great richness that again, isn't over-powering, but compliments the sweetness well. Cooked peanut butter doesn't give the same flavor as you might get from other chocolate-peanut butter recipes that's overpowering. It actually gets deeper and more rich and looses some of it's sugar, this is a much more refined faux-Reeses pairing.

Brown Butter Oatmeal Cookies with Chocolate Chips and Peanut Butter

Ingredients:
1 stick butter, cut into T chunks (see above on brown butter)
1/2 c white sugar
1/2 c packed brown sugar (dark or light, your choice)
1 large egg
1 t vanilla extract
1 1/4 c all-purpose flour
3/4 c old fashioned oats
1/4 t salt
1/2 t baking powder
1/2-1 c chocolate chips (or other "mix-ins")
peanut butter

Method:

Preheat oven to 350.

In a small sauce pan, melt butter on medium/low heat to create brown butter. Follow directions in tutorial above. Remove from heat.

In a bowl mix sugars, egg, and vanilla together. Slowly add the butter to temper the eggs. Mix until well combined.

Mix in oats, flour, salt and baking powder until dough forms. Add in any chocolate chips, nuts etc. here.

Place in fridge for 20 minutes to chill.

Drop heaping tablespoons of dough onto a parchment-lined baking sheet. Top each cookie dough ball with a dollop (around a tsp.) of peanut butter.

Bake for 12-14 minutes or until the cookies are golden.

Allow to cool for 10-15 minutes before eating (the peanut butter will be like lava!). These do become "crunchier" when fully cooled, so microwave a few seconds when enjoying later.

Wednesday, February 12, 2014

Staying Warm with Spicy Food

Once again we're getting ready for a major snowstorm and preparing for a ton of snow and ice. Our priority is staying warm and full. We do have wine, but drinking alcohol actually increases your risk of hypothermia, so instead we're eating spicy food to help warm us from the inside out.

We both enjoy Thai food and frequent Thai Spice in Waynesville - which makes delicious, authentic dishes - as often as we can. However, when we can't make it over the mountain we are learning to make our own Thai-inspired dishes. Jordan's mastered a Thai pizza with peanut sauce, chicken and carrots; I make a chicken, turkey or tofu panang curry and this peanut noodle dish is a great addition to our repertoire.

This recipe is easy (only 15 minutes start to finish) and boy, it is "Thai hot." If you're more tender-tounged and don't enjoy spicy food, this recipe could easily be toned down, and I think I will adjust the spice level myself next time (noted in the recipe). It's a quick dish that provides a serving of lean protein and whole grains with vegetables. Paired with Lean Cuisine's Thai-style chicken spring rolls (a favorite in our house), the entire meal is less than 600 calories.


I especially appreciate that the ingredients in this dish are familiar, and actually are pantry staples at our house. Sometimes, making foreign cuisines can involve exotic, hard-to-find ingredients and require last minute, oftentimes sub-par substitutions. This dish allows you to transform everyday items into an international treat!

The sauce lends a great, deep peanut flavor and creamy coating to the noodles and vegetables. The chopped peanuts layer the nutty flavor but add a much needed crunch. The ground chicken adds to the texture but it's mild flavor is easily manipulated with the sauce; you could use ground turkey as well which has a more assertive flavor, as well. This is a delicious dish that can certainly hold us over until our next Thai Spice adventure.

Thai Chicken Peanut Noodles

Ingredients:

1/4 c creamy peanut butter
1/2 c reduced-sodium chicken broth
1/4 c lemon juice
1/4 c reduced-sodium soy sauce
4 tsp. sriracha*
1/4 tsp. crushed red pepper flakes*
12 oz. uncooked whole grain spaghetti
1 lb. lean ground chicken (or turkey)
1 1/2 c julienned carrots
1 medium sweet red pepper, chopped *
1 clove garlic, minced
1/2 c finely chopped peanuts
4 green onions, chopped

* The spice level here is very hot, consider cutting the sriracha amount in half and omitting the crushed red pepper all together. Also, you may also consider using a green bell pepper - although subtle, the red pepper can add extra spice, too. If you think the sauce is still too spicy, you can add sour cream or cream cheese (1 T at a time) to the sauce mixture or serve it at the table.

Method:

Whisk the first six ingredients in a bowl until well blended.

Cook spaghetti according to package directions, drain.

Meanwhile, cook chicken, carrots, pepper and garlic in large pan over medium heat until chicken is no longer pink. Drain and return to pan.

Stir in peanut butter mixture and bring to a boil. Simmer until sauce thickens slightly (3-5 minutes). Toss spaghetti in the pan with sauce.

Serve topped with green onions and peanuts.


Sunday, January 12, 2014

Skinny Baked Potato Soup


This recipe combines (at least) two of my favorite things: full-flavor soups with a healthier twist and freezer-friendly meals.

Both of these themes tie in well with this week's events. We're getting married in seven days (!!) and thus have been so busy that finding time to cook has been nearly impossible; and yet, for our bodies' sakes we need to take it easy on the fast food and eating-on-the go.

I was originally drawn to this dish because I love cauliflower and experimenting with it. It has such a wonderful texture and such a mild flavor that you can dress it up with almost anything you'd like, and make it taste decadent without compromising your figure. And in this recipe, you do just that. This soup is creamy and thick with all the flavor and wonderfully smooth texture of a loaded baked potato soup - and yet there's almost equal parts cauliflower to potato and not a drop of cream. With the right toppings, this meal could be not just meatless, but vegan! And before toppings, this soup is only 137 calories per serving (of which it makes ten).

This six-ingredient recipe (not including oil)  is incredibly inexpensive considering it makes ten servings - even assuming you keep nothing on hand other than oil or salt, it'd be less than $1/serving. I usually make a big pot on the weekend and serve us each a bowl for dinner and then freeze around three quarts of it for later.

I love freezer meals because they theoretically allow you to spend time cooking when you have it and then merely have to reheat a meal later when you're short on time. Admittedly, some frozen meals aren't worth the trouble - you have to thaw them days in advance, cover with foil, cook at this temperature then rotate and do "finishing" steps with crusts etc. But this soup is truly a breeze. I usually pull it from the freezer the morning I intend to serve it for dinner and leave it in the fridge. That evening, all I have to do is dump it in a pot and reheat. I also include a quick re-blending in the food processor or with the immersion blender just to make sure all of the ice crystals are broken up uniformly.

And as for the toppings - add anything you'd normally put on a loaded baked potato or cream of potato soup. I usually opt for a generous swirl of Cholula hot sauce, green onions and cheddar cheese; and bacon crumbles if we have them on hand (duh!). It would also be delicious with a little chili on top and some corn chips or by itself, too. And any little crunchy add on - like croutons, creates a dynamic texture. It's truly a blank canvas - it has rich, simple flavors like mashed potatoes, but could be built upon in any direction you'd like to venture.

If you're looking for a comfort food that won't spoil your new year's resolutions, an awesome alternative appetizer for your Super Bowl party or a great time saver for the work-week dinners, give this recipe a try. It's a winner.

Skinny Baked Potato Soup

Ingredients:
1 T olive oil
1 large onion, sliced
1 large stalk celery with leaves, roughly chopped
1 large clove garlic, minced
1/2 large head of cauliflower (6-8 c), stem removed and roughly chopped 
6 c starchy potatoes (like russets) peeled, roughly chopped (same size as cauliflower chunks)
5 c vegetable or chicken stock
1 1/4 t salt (more to taste)

Method:

In a large pot heat oil over medium heat. Add onions and lower heat slightly. Saute 5-6 minutes or until softened, but not fully transparent. Add celery and continue to cook for a few minutes until celery is softened. Add the garlic and cook for one minute. 

Add the cauliflower, potatoes and stock. Bring to a boil, reduce to simmer and cover. Cook for 15-20 minutes until potatoes and cauliflower are fork-tender. 

Remove from heat and cool slightly if using a blender. Use blender or immersion blender to blend the soup until as smooth as possible. You can add water or stock to thin out your soup as needed. 

Serve hot with loaded potato toppings like chives, green onions, cheese or bacon crumbles. 

Sunday, January 5, 2014

My Most Epic Post Yet: Soup vs. the Polar Vortex

Now parts of the US are experiencing and preparing for an extreme cold snap. The Polar Vortex, as dubbed by one scientist, will bring incredibly cold temperatures which in some areas may be 30 degrees below zero (with wind chill bringing it down even further)! In our area, we are expecting a high tomorrow of 15 and a low of -4.


In North Carolina - and probably other Southern places - talk of cold and snow causes a run on  bread and milk, a panic I have never understood. Personally, if I'm fearing frigid temperatures and preparing to be stuck at home, I want comforting foods that are easy to heat (especially without electricity) but still delicious. To this end, I've been making soup and our weekly menu plan features another soup recipe and Jordan's chili.

Yesterday, which was especially cold in the morning, inspired me to make a try a new vegetable soup recipe - winter vegetable minestrone. This recipe was an easy-to-make one pot meal. This recipe takes advantage of the wonderful produce available in wintertime; but you could easily swap out some of the more seasonal vegetables (like butternut squash) for an alternative (potatoes, for example) any time of year. For example, I was unable to find Savoy cabbage at my local market but swapped it out for Napa cabbage; you could use any easily tenderized greens, like spinach, too.

Minestrone is is a traditional tomato-based Italian soup brimming with vegetables and usually pasta in a mild broth. I am used to - and generally prefer - soups with more bold broths/bases, so this soup read as somewhat gentle in flavor. However, with that light broth, you're able to taste and appreciate each vegetables texture and unique flavor. If you're looking for something more bold, you could use low-sodium chicken or vegetable broth instead of water.

This soup is also quite healthy and would be the perfect dish for a Meatless Monday meal. Weighing in at a little over 300 calories per serving, this soup fills you up without compromising your waistline. And obviously, it is visibly full of vitamin-rich vegetables that are good for the whole family. If your children are picky eaters, it might be a hard sell to convince them to eat an all-veggie soup. However, the simplicity of this dish makes it a great kid chef-friendly soup that they can make themselves (they'll need some knife and stove supervision but that's it). And when children take ownership of their nutrition and food preparation, they're proud of what they've cooked and much more likely to eat and enjoy their meals.

With a piece of warm, crusty bread this soup is sure to fill you up, satisfy your appetite and warm up your whole body. I hope you all keep safe and warm during this impending winter storm and enjoy something delicious that protects you from the cold, heating you from the inside out. We will be inside with mugs of soup!


Winter Vegetable Minestrone

Ingredients:
1 medium onion, chopped
1Tbsp. salt
1/2 tsp. black pepper
2 Tbsp. olive oil
1 Tbsp. minced garlic
1, 14.5 oz. can diced tomatoes
1 small butternut squash, peeled and cubed
3 medium carrots, peeled and chopped
1, 15 oz. can navy beans, rinsed
1, 3" piece of Parmesan rind (ask at the deli counter, they usually have leftovers for cheap)
6 c water
1/2 c small pasta shells (or any mini pasta like bowties or elbows)
1/4 chopped Savoy (or Napa) cabbage

Method:

Cook onion with salt, pepper and garlic in olive oil over medium heat, stirring frequently, for 8-10 minutes until the onion is soft. Add tomatoes and their juice and simmer 6-8 minutes until thickened. Add squash, carrots, beans and Parmesan and water. Simmer until vegetables are fork-tender, about 20-25 minutes. 

If you intend to serve all of the soup (4 servings) at once, add your pasta. However, if you anticipate leftovers and eating on this for several meals, cook enough pasta (1/8 c per serving) for the immediate meal and add it at the end. If you add your pasta now and package it for reheating later, the pasta will absorb too much liquid and become bloated and mushy. If making ahead for a later meal, stop here then add the cabbage and pasta when reheating later. 

Add cabbage and simmer until pasta is tender (if cooked in the soup) or 6 minutes. Remove the remains of the rind.  

Serve topped with grated Parmesan and warm, crusty bread. (I used an "everything" topped French bread, drizzled with olive oil and broiled just until crispy on the outside).